Wednesday 30 September 2009

Cleaning (Clean up) the history documents in the start menu

Document history is a link that is automatically created by windows when you open a document in the form of images, videos, microsoft office files, and other applications (see picture below). If too much history link will affect the performance of your windows, you should delete it.


Can be done to clean the following steps:

1. Right-click on the taskbar, click Properties


2. In the dialog box taskbar and startmenu properties, select the Starmenu tab, click the Customize button


3. In the customize classic start menu dialog box click the Clear button, press the OK


4. If successful it will look empty document history.


How to back up and restore the registry in windows

Backup your registry is very important to do, in case something goes wrong when you edit the registry and you must restore the registry.. so if you have backup you still can restore to normal conditions.

Here's how to backup and restore the registry

A. to back up the registry do the following

1. On the Start menu, select Run type regedit


2. In the Registry Editor dialog box, select File => Export


3. Save the file, for example: backupreg12des (by default this file extention : reg, backupreg12des.reg)
Click the save button (this file any time you can use if something goes wrong in the registry settings)


B. Restore the registry to the initial (normal) conditions

Procedure I.
Search backupreg12des.reg file, then double click the file, the registry will be updated automatically (restore)


Procedure II
Sign in to regisrtry editor
on the menu bar, select File => Import
search files backupreg12des.reg (customize to your backup file), click OK.

You can use one of the two procedure

Change the menu show delay for speed up start menu show

Menu show delay is the delay time to bring up the menu on the start menu and programs menu, so that the menu appears faster when the cursor is highlighting the folder menu items on the menu it will soon open.

Here's how to set the menu show delay on your desktop.

1. At the start menu click run type regedit, and click OK


2. In the registry editor dialog box, open the directory:
My Computer \ HKEY_CURRENT_USER \ Control Panel \ Desktop \
Find a string that reads: MenuShowDelay, then double click MenuShowDelay after the edit dialog box appears type the string value data: 0 (zero)


Click Ok.
Then restart your computer and observe the changes at the time of the appearance of menus and sub menus in the start menu and program menu.

Tuesday 29 September 2009

Code (cheat code) hearts game

Hearts game is one built in game in windows. Rules in this game is you have to avoid collecting the hearts card (can be 1 point penalty / one heart card, and if the Queen of spades can kick 13 points). Winner of this game is the smallest gain penalty points, and the game will end if there is one player who collects the value of 100.

There is a way cheating (cheat codes) hearts game in windows, you can use to ease win in this game. You need to make some changes to the registry. If you are interested can follow the following steps:

1. On the start menu select Start menu -> Run, type regedit, and click OK


2. In the registry editor box, find the following directories:
HKEY_CURRENT_USER / Software / Microsoft / Windows / CurrentVersion / Applets / Hearts


3. Right-click on the right side registry editor, select New -> String Value
New Value will appear # 1


4. Right-click on the New Value # 1
Select Rename
Replace New Value # 1 with ZB


5. Double-click ZB (New Value # 1 that has been replaced / renamed into ZB)
In the value data type 42
Click OK

Close the Registry Editor dialog box.

6. Open your hearts Game

7. On the keyboard, press the key combination Ctrl + Alt + Shift + F12 (without the +)
The result you can see the cards your opponents, so much easier to win.


Monday 28 September 2009

How to integrate a SATA AHCI driver in a Windows XP Setup CD

If your computer (pc / notebook) use SATA type hard drive and choose to install Windows XP Operating System, chances are when you install Windows XP can not recognize the SATA hard disk, but your hard drive can be recognized by the bios, if this happens then you must inject your computer sata drivers into a windows installer file. Usually files sata drivers already in the cd driver notebook / mainboard that you get when you buy a computer.

If the sata driver is not in cd, you can find on your computer manufacturer website, the site into the driver tab, then do browse and use keywords your computer's specifications. For notebook use the code or your notebook series:
example: (Notebook) Acer TravelMate 6291,


Description: From personal experience, some computer or notebook now there is notneed to do injection sata drivers, such as the latest type acer notebook don't need sata drivers, just need to do configuration on a hard disk interface settings in bios, if you want to install Windows XP disk then change to the interface IDE or ACHI (commontly in peripheral settings).

Software to inject sata drivers into the windows installer is nLite (a freeware software), you can download the software they will be on site: download nliteos


Once downloaded, just install nLite, if not installed on your computer usually needs to be installed windows XP service pack, ie NET Framework 2.0
can be downloaded at:
http://www.nliteos.com/download.html, or in http://www.microsoft.com/downloads http://www.microsoft.com/downloads/details.aspx?FamilyID=79bc3b77-e02c-4ad3 -aacf-a7633f706ba5 & displaylang = en

1. The next step is to start the process of injection sata drivers into the windows installer. This process should you do on a computer that has an active windows.
Copy the entire contents of the windows cd (original) into the hard disk, a directory named for example: WinXPSP2
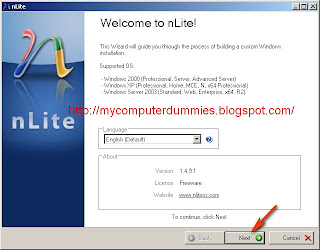
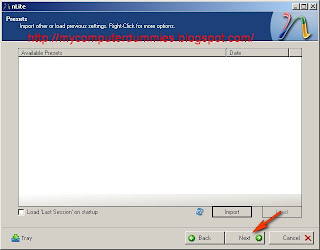
Then run the program nLite

2. Click Next


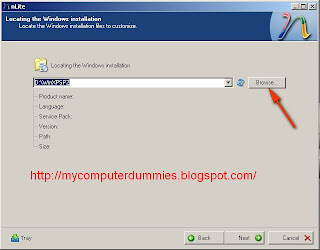
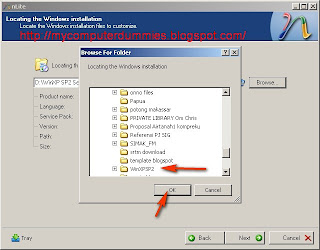
3. Click Browse, navigate to the directory that contains the windows installer file (D: WinXPSP2)


4. Click OK


5. Click on Next, it will appear the following dialog box:
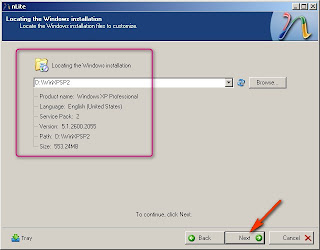

6. Click Next


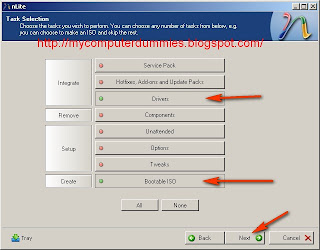
6. Click the Driver and Bootable ISO until the green button
(Driver: to integrate sata drivers ie drivers into wiindows installer, you can also include other driver)
(Bootable ISO installer for windows that you create can boot automatically when the CD has been copied )
Click the Next button


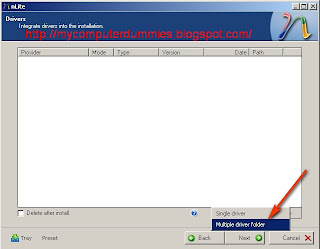
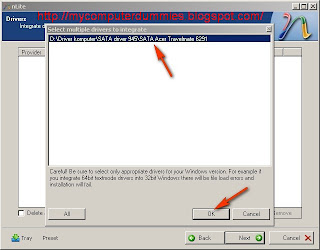
7. Select Multiple driver folder if the driver is more than one, if only one file just select a single driver


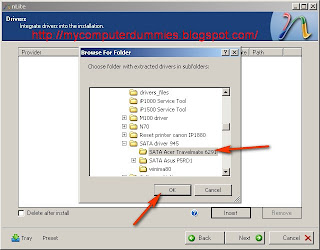
8. Find the file that contains the sata drivers on your computer, click OK


9. Select Sata driver
Click Ok


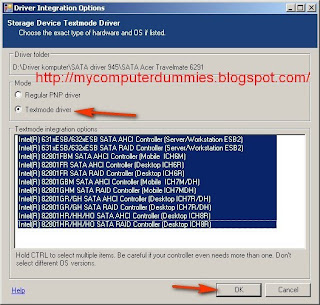
10. Select Textmode driver
Click OK


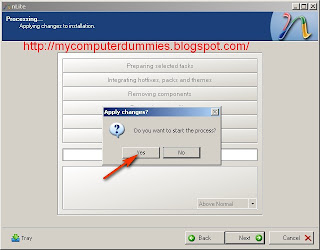
11. Click Yes in the dialog box "Do you want to start the process?"


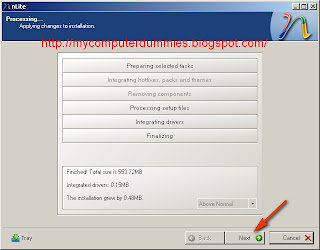
12. Click Next (you've managed to integrate sata drivers into the windows installer), then you will create an ISO file or directly burning to a CD blank
Click next


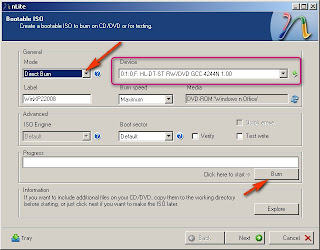
13. Now you can make a first ISOnya, or burning directly to blank CDs. Insert the CD into the CD RW Drive and press the Burn button,
Congratulations you already have a installer file of windows with sata driver integrated.


14. Next step is to go back to your first computer, run the computer and set the bios settings to boot from the CD ROM started.

15. Please you're installing windows installer file with this CD, follow instruction, if not problem then dialog confirmation of sata drive would not be asked again and sata hard drive you have can be recognized by installer Windows XP (if not yet recognized that there are sata driver files that you have not injection to windows installer, please doing the procedure 1 to 12 to fix it, select other compatible sata drive " text mode driver" )

Good luck .....!!!!!!

Using FragExt to manage file fragmentation

FragExt is a free application and shell extension set, designed to help you manage file fragmentation on FAT, FAT32 and NTFS volumes.

The set includes

* A unique file defragmenter which allows you to defragment specific files rather than an entire volume.
* A file property extension for displaying detailed information about a file's, folder's and NTFS data stream's fragmentation information.
* Windows Explorer column and info-tip extensions for displaying file fragments, extents, clusters, disk space usage and alternate data streams.
* Integration extensions for simplifying the use of the FragExt defragmenter, allowing you to select and defragment files directly from within Windows Explorer.
* Simple reporting features allowing you to save the information FragExt gathers.
* A scriptable defragmentation engine, allowing you to create your own custom utilities.

To use the application Fragext can follow the following procedure:


1. Open the application fragext
2. Select Add File


3. Files to be in defrag, in this example I use the existing file in the folder
C: / Windows/System32 /
(I just select the file without a folder)
Click the Open button
then the defrag process will start


4. When completed a message will appear Completed


You can start defrag of other file .

Change your Windows XP desktop to look like Windows 7 uses Seven Transformation Pack

Seven Transformation Pack (freeware) will convert your Windows XP based system to look like Windows 7 and some of its features emulated. You don't have to purchase Windows 7 or any 3rd-party applications to get Windows 7 UI experiences. This transformation pack will simply make it done for you for free!

This will update your Windows XP and Windows Server 2003 with Windows Seven GUI by adding some themes and replacing system files.

Seven Transformation Pack gives to your system the fresh and cool look of Microsoft's new operating system: Windows 7. The pack changes most of the system icons, skins and toolbars and also adds new enhancements to your desktop.


What's New in This Release

· Added automate configuration on startup for first-run user account
· Added deferred 3rd-party applications startup
· Added system files modification support for Windows Vista including
· Branding
· Main icons set
· Logon screen background
· Fixed Disable unsafe configuration that may harm system in Welcome Center being disabled in Windows Vista
· Fixed icon size not restoring to 32x32 after uninstallation in Windows XP/2003
· Fixed MS Sans Serif font option not being configured
· Fixed out-dated settings of first-time configuration in Welcome Center
· Fixed system files verification reporting "Repair Needed" when both system file and backup not exist
· Fixed Use recommended application settings in Welcome Center permanently disabling applications don't meet requirements
· Removed annoying Display -> Appearance dialog after uninstallation in Windows XP/2003
· Updated configure user account to remember previous configuration
· Updated main dialogs' titlebar to dialog's name instead of application


Download Seven Transformation Pack freeware here , file size about 23 MB

Friday 25 September 2009

Using GPU-Z to detect the VGA specification

In addition to using portable applications CPU-Z (freeware) to detect the hardware specification : processor, mainboard, and memory. You can also use GPU-Z to detect the graphics processing specifications in the VGA module installed on your computer.
GPU-Z software size approximately 460 KB. You do not need to install it. because the file is only executable files. Simply, double click the exe file GPU-Z it will automatically detect the specifications of VGA card installed in your computer

Example you can see it looks like below


If interested can download it click the following link GPU-Z

About Google and the "Keywords" Meta Tag

Google does not use the "keywords" meta tag in its web search ranking. Google's Matt Cutts explains this in a Webmaster Central video. This is not breaking news, by any means, but there are a lot of people out there that still put a lot of stock into this.

In fact, Cutts mentions that people have sued each other for meta tag keyword theft, when really this is just a waste of everybody's time, because they don't even play a role in the ranking of sites on Google. Have you been under the impression that the keywords meta tag was important to ranking in Google? Comment here.


"About a decade ago, search engines judged pages only on the content of web pages, not any so-called "off-page" factors such as the links pointing to a web page," says Cutts. "In those days, keyword meta tags quickly became an area where someone could stuff often-irrelevant keywords without typical visitors ever seeing those keywords. Because the keywords meta tag was so often abused, many years ago Google began disregarding the keywords meta tag."

Just because Google ignores the "keywords" meta tag, that doesn't mean it ignores all meta tags. In fact, there are several that the search engine definitely uses. For one, Google sometimes uses the "description" meta tag as the text for search results snippets. But even in then, the "description" meta tag isn't used to influence ranking.

Google also recognizes the "google," "robots," "verify-v1," "content type," and "refresh" meta tags. Information about how Google understands these can be found at this page in the Webmaster Tools help center.

"It's possible that Google could use this information in the future, but it's unlikely," Cutts says of the "keywords" meta tag. "Google has ignored the keywords meta tag for years and currently we see no need to change that policy."

So the moral of the story is, if a competitor is jacking your keywords, and using them in their own "keywords" meta tag, this will have no effect whatsoever in how they rank in Google when compared to your site. Cutts says other search engines might use the information, but Google doesn't.

Google does note that its enterprise Search Appliance has the ability to match meta tags, but this is of course separate from Google web search.

As I have said before, these videos and other tips Google frequently gives out are worth paying attention to for any webmaster looking to rank well. Whether they're talking about duplicate content, meta tags, or paid links, they're all aimed at telling webmasters how it is, and clarifying any misconceptions to the contrary. Whether you agree with Google's methods in all cases or not, the tips are for your benefit.

Like it or not, Google controls what people find on the web when they search. The company's huge market share is just something that is. There is always the possibility that could change in the future, but at this point, it looks like webmasters are not going to be able to ignore Google for a long time, if they hope to be found on the web by searchers

Friday 11 September 2009

Kenali dan Kunjungi Objek Wisata di Pandeglang Support

postingan ini dibuat khusus untuk mensupport Kenali dan Kunjungi Objek Wisata di Pandeglang. Dukungan di diharapkan dapat menabah link ke blog Artikel Komputer dalam rangka optimasi SEO Pandeglang

Kenali dan Kunjungi Objek Wisata di Pandeglang !. Adalah sebuah kontes SEO bernuansa alam dan budaya lokal. yang berlangsung dari tanggal 17 Agustus 2009 pukul 00.00 WIB sampai dengan 17 November pukul 24.00 WIB.

Di bawah ini ada beberapa lokasi wisata di Pandeglang yang layak untuk dikunjungi

A. Wisata Alam


1. KAWASAN WISATA TANJUNG LESUNG
2. KAWASAN PANTAI BAMA,
3. PANTAI CIPUTIH,
4. PEMANDIAN CIKOROMOY , sesuai namanya ini tempat mandi-mandi jadi kalo tidak suka mandi jangan kesana, kecuali jika ingin berkunjung sekedar melihat orang mandi bisa kesana untuk Kenali dan Kunjungi Objek Wisata di Pandeglang
5. CURUG GENDANG, merupakan wisata air terjun
6. PEMANDIAN AIR PANAS BELERANG CISOLONG,
7. WISATA GUNUNG KARANG,
8.PEMANDIAN ALAM CITAMAN
Merupakan tempat pemandian alami di Kaki Gunung Pulosari. Pemandangan disekelilingnya sangat indah. Terletak di Kecamatan Jiput.
9.TAMAN NASIONAL UJUNG KULON
Ini yang perlu dilestarikan, karena disana ada si pemalu berbadan besar yaitu Badak Ujung Kulon dan Kunjungi Objek Wisata di Pandeglang

B. Wisata SENI dan Budaya
Ada Rampak Bedug, Pading pading, pencak silat, debus, dan lain-lain mungkin ondel-ondel juga.

Saturday 5 September 2009

Download and convert YouTube videos and Google videos using Any Video Converter

Any Video Converter Free Version can also download and convert YouTube videos and Google videos. There is open source software to perform almost every task for video conversion. But if you are one of these windows users who are looking for an All-in-One video converting tool with easy-to-use graphical interface, Any Video Converter provides just that, allowing you to effortlessly convert video files between every format, for FREE!


Any Video Converter Free Version can convert avi, asf, mov, rm, rmvb, flv, mkv, mpg, 3gp, m4v, and vob to avi, wmv, mp4, 3gp, mpg (PAL or NTSC), MPEG-1 and MPEG-2, wmv and flv.

Any Video Converter makes batch file conversion simple. Create a batch list of any different formats and convert them all to a single selected format. The converted files will be saved to a pre-selected directory folder and the original files will remain untouched.

It can convert almost all video formats including DivX, XviD, MOV, rm, rmvb, MPEG, VOB, DVD, WMV, AVI to MPEG-I, MPEG-I, DVD NTSC , DVD PAL, Flash for Video (FLV) ,AVI Video and Customized WMV movie formats. It also supports any user defined video file formats as the output. It has an unmatchable speed and high quality.

Whether you are looking for free PSP video converter, free 3GP video converter, free FLV video converter, free MP4 converter, or free YouTube converter, Any Video Converter Free Version is the right application for you. Download the free video converter now to convert videos and experience better digital life.

Download Any Video Converter Free Version


Friday 4 September 2009

How to capture video images using Power DVD

For friends who often watch a video (movie) may have often capture (screenshot / snapshot), or take pictures from the video is playing (play) by your media player. One of the video capture software is Cyberlink Power DVD (I use version 6). Cyberlink Power DVD application is sometimes a bonus when you buy a DVD /-RW Player DVVD. (I got this software when buying Asus DVD player, every brand DVD player may be different gift or complement)

To capture the video into images, can do the following procedure:

1. In the control panel, click the settings button (the hammer-screwdriver button)


2. Select tabulation player
Click Advanced


3. Select tabulation snapshot
Select Capture to file
Note:
You can adjust the location / folder where you store files in the capture of another folder by selecting the browse button


Click OK


4. Open / run your video or film. when the video is playing then the capture button (located on the control panel will be active).
Click the capture button (camera button) to capture video images, capture files will be stored in folders that you specify (see step 3)


How to capture video images using Windows Media Player

For friends who often watch a video (movie) may have often capture (screenshot / snapshot), or take pictures from the video is playing (play) by your media player. One of the video capture software is Windows Media Player Classic. This post complements the previous postings about how to capture video in Power DVD


Note:
Windows media player classic is a little different with Windows Media Player built in Windows XP. the difference is Windows Media Player Classic is equipped with a codec that is more complete, so recognize more video and audio formats.

To download the Windows media player classic, you can download the klite codec (free). When codec is installing automatic windows media player will be installed.

After installing these codec. Open the application windows media player classic

1. Select View -> Options


2.Select Output
Select Haali renderer
Click OK


3. Play the video / film


4. Select File -> Save Image, or directly press the Alt + I (on keyboard)


Click save


notes:
If the store image, drawing blank (no image appears), try clicking the pause button, located next to the play button. then repeat step 4.
Above cases usually occur when your computer vga not strong to render the video.


Wednesday 2 September 2009

Earn money (dollar) from Linkshowoff

Linkshowoff which helps publishers to easily sell links on their sites/blogs without the fear of being penalised by google for it cos the links in this widget are made "nofollow" . If you like this widget and want to put one on your site/blog then please sign up through my referral link click here


About Linkshowoff

Will Google penalize me for using LinkShowOff?
No - Google does not penalize for selling nofollow links. The links shown in the LinkShowOff widget are made nofollow as per Google's guidelines.


How much can I earn?
How much you earn depends on how you price your advertising and whether advertisers think your site is suitable for their purposes.

Are subdomain (.blogspot, etc) blogs and websites allowed in the marketplace?
As long as you can add a JavaScript widget to your website, you can use LinkShowOff.

How long do links stay on the widget?
Links stay on the widget forever until they are bumped off by newer links. For example, if you set a max amount of five links on your widget and you achieve that number, the next link bought will take the place of the first link, the first link will be bumped down to the second link, and so on. The fifth link would be removed overall from the widget.

Are there any fees or revenue sharing?
We charge a small fixed transaction fee of $3 on every payout made monthly to our widget users, but that’s it. For example, if you earn a total sum of $100, you will be paid $97.

How do advertisers find widgets to advertise on?
Advertisers can use our site marketplace to find websites to put their links on. In addition to that, if they come upon a site with the widget they can simply click on it to go directly to the advertising page.

What are the payment methods?
All payments will be made by Paypal.

What's the minimum payout limit?
The minimum payout limit is $10.

Is there any referral system?
Yes, you will get $3 for every referral that earns $3.

What happens if a publisher disapproves of a link?
If a publisher finds a link inappropriate it can be taken off and the advertiser will be refunded in full.

Linkshowoff

Tuesday 1 September 2009

Domain name of Google Search engine

Search engine Google has a lot of domain names in the world, almost in every country have google own domain name.

The following list of Domain names Google in Various Countries:

USA = www.google.com

Afghanistan = www.google.com.af
American Samoa = www.google.as
Anguilla = www.google.off.ai
Antigua and Barbuda = www.google.com.ag
Argentina = www.google.com.ar
Armenia = www.google.am
Australia = www.google.com.au
Austria = www.google.at
Azerbaijan = www.google.az


Bahrain = www.google.com.bh
Bangladesh = www.google.com.bd
Belgium = www.google.be
Belize = www.google.com.bz
Bolivia = www.google.com.bo
Bosnia and Herzegovina = www.google.ba
Botswana = www.google.co.bw
Brazil = www.google.com.br
British Virgin Islands = www.google.vg
Bulgaria = www.google.bg
Burundi = www.google.bi

Canada = www.google.ca
Chile = www.google.cl
China = www.google.cn
Colombia = www.google.com.co
Congo, Democratic Republic of the = www.google.cd
Congo, Republic of the = www.google.cg
Cook Islands = www.google.co.ck
Costa Rica = www.google.co.cr
Croatia = www.google.hr
Cuba = www.google.com.cu
Czech Republic = www.google.cz
Cote dCase Ivoire = www.google.ci

Denmark = www.google.dk
Djibouti = www.google.dj
Dominica = www.google.dm
Dominican Republic = www.google.com.do


Ecuador = www.google.com.ec
Egypt = www.google.com.eg
El Salvador = www.google.com.sv
Estonia = www.google.ee
Ethiopia = www.google.com.et

Fiji = www.google.com.fj
Finland = www.google.fi
France = www.google.fr

Gambia = www.google.gm
Germany = www.google.de
Gibraltar = www.google.com.gi
Greece = www.google.com.gr
Greenland = www.google.gl
Guatemala = www.google.com.gt
Guernsey = www.google.gg

Haiti = www.google.ht
Honduras = www.google.hn
Hong Kong = www.google.com.hk
Hungary = www.google.hu

Iceland = www.google.is
India = www.google.co.in
Indonesia = www.google.co.id
Ireland = www.google.ie
Isle of Man = www.google.co.im
Israel = www.google.co.il
Italy = www.google.it

Jamaica = www.google.com.im
Japan = www.google.co.jp
Jersey = www.google.co.je
Jordan = www.google.jo

Kazakhstan = www.google.kz
Kenya = www.google.co.ke
Kyrgyzstan = www.google.kg

Latvia = www.google.lv
Lesotho = www.google.co.ls
Libya = www.google.co.ly
Liechtenstein = www.google.li
Lithuani = www.google.lt
Luxembourg = www.google.lu

Malawi = www.google.mw
Malaysia = www.google.com.my
Malta = www.google.com.mt
Mauritius = www.google.mu
Mexico = www.google.com.mx
Micronesia = www.google.fm
Mongolia = www.google.mn
Montserrat = www.google.ms
Morocco = www.google.co.ma

Namibia = www.google.com.na
Nepal = www.google.com.np
Netherlands = www.google.nl
New Zealand = www.google.co.nz
Nicaragua = www.google.com.ni
Norfolk Island = www.google.com.nf
Norway = www.google.no

Oman = www.google.com.om

Pakistan = www.google.com.pk
Panama = www.google.com.pa
Paraguay = www.google.com.py
Peru = www.google.com.pe
Philippines = www.google.com.ph
Pitcairn = www.google.com.pn
Poland = www.google.pl
Portugal = www.google.pt
Puerto Rico = www.google.com.pr

Qatar = www.google.com.qa

Romania = www.google.ro
Russia = www.google.ru
Rwanda = www.google.rw

Saint Helena = www.google.sh
San Marino = www.google.sm
Saudi Arabia = www.google.com.sa
Senegal = www.google.sn
Seychelles = www.google.sc
Singapore = www.google.com.sg
Slovakia = www.google.sk
Slovenia = www.google.si
South Africa = www.google.co.za
South Korea = www.google.co.kr
Spain = www.google.es
Sri Lanka = www.google.lk
St.Vincent and the Grenadines = www.google.com.vc
Sweden = www.google.se
Switzerland = www.google.ch

Taiwan = www.google.com.tw
Tajikistan = www.google.com.tj
Thailand = www.google.co.th
The Bahamas = www.google.bs
Tonga = www.google.to
Trinidad and Tobago = www.google.tt
Turkey = www.google.com.tr
Turkmenistan = www.google.tm

U.S. Virgin Islands = www.google.co.vi
Uganda = www.google.co.ug
Ukraine = www.google.com.ua
United Arab Emirates = www.google.ae
United Kingdom = www.google.co.uk
Uruguay = www.google.com.uy
Uzbekistan = www.google.co.uz

Venezuela = www.google.co.ve
Vietnam = www.google.com.vn

Zambia = www.google.co.zm

Random Posts