Tuesday 28 April 2009

Windows Explorer Shortcuts

List of Windows Explorer Shortcuts:

ALT+SPACEBAR - Display the current window’s system menu
SHIFT+F10 - Display the item's context menu
CTRL+ESC - Display the Start menu
ALT+TAB - Switch to the window you last used
ALT+F4 - Close the current window or quit
CTRL+A - Select all items
CTRL+X - Cut selected item(s)
CTRL+C - Copy selected item(s)
CTRL+V - Paste item(s)
CTRL+Z - Undo last action
CTRL+(+) - Automatically resize the columns in the right hand pane
TAB - Move forward through options
ALT+RIGHT ARROW - Move forward to a previous view
ALT+LEFT ARROW - Move backward to a previous view
SHIFT+DELETE - Delete an item immediately
BACKSPACE - View the folder one level up
ALT+ENTER - View an item’s properties
F10 - Activate the menu bar in programs
F6 - Switch between left and right panes
F5 - Refresh window contents
F3 - Display Find application
F2 - Rename selected item


Windows XP Shortcuts

Windows XP Shortcuts List:

ALT+- (ALT+hyphen) Displays the Multiple Document Interface (MDI) child window's System menu
ALT+ENTER View properties for the selected item
ALT+ESC Cycle through items in the order they were opened
ALT+F4 Close the active item, or quit the active program
ALT+SPACEBAR Display the System menu for the active window
ALT+TAB Switch between open items
ALT+Underlined letter Display the corresponding menu
BACKSPACE View the folder one level up in My Computer or Windows Explorer
CTRL+A Select all
CTRL+B Bold
CTRL+C Copy
CTRL+I Italics
CTRL+O Open an item
CTRL+U Underline
CTRL+V Paste
CTRL+X Cut
CTRL+Z Undo
CTRL+F4 Close the active document
CTRL while dragging Copy selected item
CTRL+SHIFT while dragging Create shortcut to selected iteM
CTRL+RIGHT ARROW Move the insertion point to the beginning of the next word
CTRL+LEFT ARROW Move the insertion point to the beginning of the previous word
CTRL+DOWN ARROW Move the insertion point to the beginning of the next paragraph
CTRL+UP ARROW Move the insertion point to the beginning of the previous paragraph
SHIFT+DELETE Delete selected item permanently without placing the item in the Recycle Bin
ESC Cancel the current task
F1 Displays Help
F2 Rename selected item
F3 Search for a file or folder
F4 Display the Address bar list in My Computer or Windows Explorer
F5 Refresh the active window
F6 Cycle through screen elements in a window or on the desktop
F10 Activate the menu bar in the active program
SHIFT+F10 Display the shortcut menu for the selected item
CTRL+ESC Display the Start menu
SHIFT+CTRL+ESC Launches Task Manager
SHIFT when you insert a CD Prevent the CD from automatically playing
WIN Display or hide the Start menu
WIN+BREAK Display the System Properties dialog box
WIN+D Minimizes all Windows and shows the Desktop
WIN+E Open Windows Explorer
WIN+F Search for a file or folder
WIN+F+CTRL Search for computers
WIN+L Locks the desktop
WIN+M Minimize or restore all windows
WIN+R Open the Run dialog box
WIN+TAB Switch between open items

Run command in windows

Below is a run command in windows
If you want to use select Start -> Run
in the run command dialog box type the code below

compmgmt.msc - Computer management
devmgmt.msc - Device manager
diskmgmt.msc - Disk management
dfrg.msc - Disk defrag
eventvwr.msc - Event viewer
fsmgmt.msc - Shared folders
gpedit.msc - Group policies
lusrmgr.msc - Local users and groups
perfmon.msc - Performance monitor
rsop.msc - Resultant set of policies
secpol.msc - Local security settings
services.msc - Various Services
msconfig - System Configuration Utility
regedit - Registry Editor
msinfo32 _ System Information
sysedit _ System Edit
win.ini _ windows loading information(also system.ini)
winver _ Shows current version of windows
mailto: _ Opens default email client
command _ Opens command prompt

Monday 27 April 2009

Make a shapefile using arccatalog

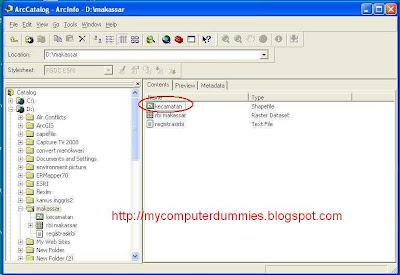
Making "shapefile" is done by using arccatalog. Shp file can be edited to show at the arcmap. The procedures performed are:

1. Activate the arccatalog from the start menu: start -> programs -> arcgis -> arccatalog (or arc using the toolbar on the catalog sheets of arc map)
2. After the active arc catalog, go to working directory (D: \ makassar)
3. Right-click on the directory , select new, click shapefile ....


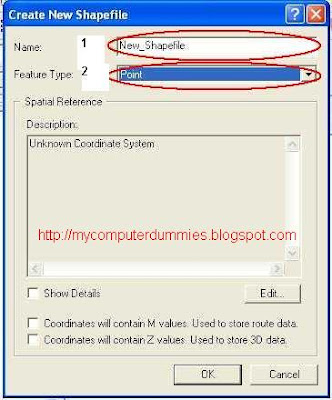
4. After dialog box appears ,
in the name box type "kecamatan", and in feature type select "polygon"
Click Edit button to determine the spatial reference


5. In the dialog box select the spatial reference properties select the button, the browse dialog box for select Coordinate system wgs 1984 Coordinate UTM zone 50S.prj, then kilk Add, click OK


6.If you have to do the above, then the spreadsheet will appear arc catalog file: kecamatan.shp


7. You can create other shape files by using step 3 to 7


Registration Raster format jpeg, bmp, tiff with georeferencing method

Raster data sometimes do not have the geographic coordinates / UTM. to facilitate the processing of data in the registration must be done against the raster. Raster data is already register will have the actual coordinates. So that it can be processed further.

In this tutorial I use the software ArcGIS version 9.2
Raster registration procedures are: (in this exercise is a Raster data map in the data format is jpg)

1. Open the Arc GIS program from start menu -> Programs -> Arc GIS -> Arc Map


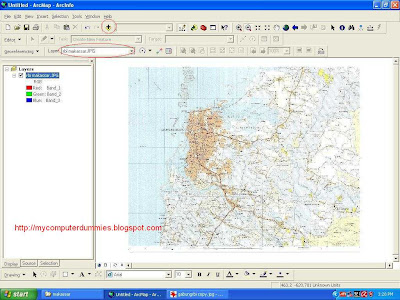
2. After the arc of the map opens, click the toolbar "+ sign" (to add a theme or Raster). After you click the toolbar "+", then a dialog box will appear and select the file you want register (in this example is used rbi_makassar.jpg). After Raster rbi_makassar appear, make sure the layer selected in the box "rbi_makassar.jpg"

arcgis tutorials
3. Activate dialog box georeferencing

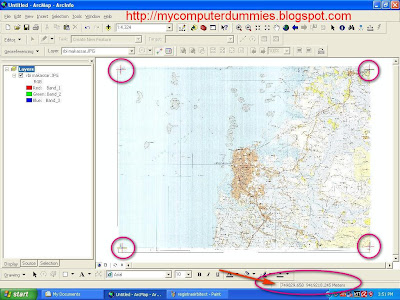
Click a button A to determine the location of the point coordinates, and click the button B to see the value and enter the coordinates (Make registration coordinates are at least 4 point, in the corner picture). Input XMap and YMap Coordinates. After registration finish, you can save the coordinate results into a file txt format with click save button.

arcgis
4. Registration results will be seen as following

registration raster

Sunday 26 April 2009

Free download cats wallpaper

Free download cats wallpaper . Below some cats wallpaper and cats picture that you can use as desktop wallpaper.


You can download cat wallpaper here Or you can use link below

Cats Wallpaper (6 MB)

Cats Wallpaper 2 (10 MB)

Free Cats Wallpaper 1 (9 MB)

Free Cats Wallpaper 2 (9 MB)

Free Cats Wallpaper 3 (9 MB)

Photo Cats Wallpaper 1 (9 MB)

Photo Cats Wallpaper 2 (2 MB)


Monday 20 April 2009

Tips To Avoid Getting Banned From Google Adsense

Google’s Adsence is one of the bests program designed to earn money online, the only thing is we need to understand that Google is a company that cannot be messed around with.

We should take care that we do not abuse the system in order to make a quick money. Many website owners break the rules of Adsense terms and conditions and get banned.

If you are pretty serious about making money from Adsense, make sure you follow all the rules and regulations to avoid yourself from getting banned. I have listed some important points that you should not even think of doing them.


1. Never click on your own Ads.
I think this is one of the biggest reasons why Adsense accounts get disabled. This seems obvious, but it’s surprising how many people actually do that intentionally. If you think by clicking on your own ads, you can fool Google, you are highly mistaken.

Google has got its own proprietary technology to find out if the publisher has clicked on his own ads. And once they know that, your account is in jeopardy.

Google wants to protect the investment of its advertisers, and it will never tolerate any false clicks. So make sure you do not make this foolish mistake.

2. Never tell others to click on your own Ads.
If you want a strong Adsense business, stay away from trouble. Don’t ask even your friends, relatives or employees to click on your ads. Do not provide any kind of an incentive to anyone for clicking on your ads.

3. Never modify Google’s AdSense code.
This is against Google’s policy. Just use the code as-is. Don’t play around with it at all.

4. Never put pictures next to your Adsense Ads.
This is a relatively new policy. When i started with Adsense, this rule did not exist. Moreover, what Google actually wanted with this policy was never very clear. Nor did Google do a good job of clearly defining what is allowed and what is not.

Even i had put some pretty images next to my Ads, and achieved excellent CTR. But here is a rule of thumb. If you are in doubt, ALWAYS play safe. When this policy was enforced, i did not waste a moment removing images that were next to my my Ads. After all, I love my Adsense account, too!

My suggestion: If you have images next to your adsense ads, remove them immediately!

5. Never title your Ads the wrong way.
You are not allowed to label your Ads with messages like “Click Here”, “Related Links” or anything else that misleads people into thinking that it is not an Advertisement.

You are however allowed to mention “Advertisements” or “Sponsored Links”, because your ads are actually Advertisements. And Google is OK with that. If you want, you may prefer not to put any label at all.

6. Never put Adsense on pages that do not have enough content.

This is something that web-masters may not be aware of. But Google allows Adsense only on pages with good content.

Therefore it is not advisable to put ads on Thank You pages, subscription pages etc. Make doubly sure that you have Ads only on pages with good content.

This also means that you should not put your ads on sites with junk content. Any site that doesn’t really add value to the visitor is considered to be a junk site

7. Never put Adsense on sites that have got prohibitive content
.
Make sure you do not have Ads on sites that have got anything to do with drugs, pornography, hatred, gambling etc.

Again, this is self explanatory, but some people simply don’t understand!

8. Never create multiple Google Adsense Accounts.
Google allows you to have only 1 personal account and 1 business account. Google links these two accounts.

9. Never try to fool Google by creating different accounts under different names.
As long as you do not get caught, its fine. But if Google traces these accounts as being used by the same person, all your accounts are in danger of being suspended.

10. Never enlist your site in any kind of auto-surf or traffic exchange programs. Again, this is against Google’s TOS. So stay clear of it.

11. Never exceed the amount of ads you can display on a page.
Currently Google only allows 3 Ad blocks, 3 Link units and 2 referral buttons to be put on one page.I personally feel Google has allowed more than what is required.

So, i don’t know why would you ever want more than this!

12. Never reveal your Adsense Data.
Google doesn’t allow public display of your CTR, Impressions, eCPM etc on forums, eBooks, websites or any other publicly viewable media.

But Google doesn’t have any objection if you mention how much you earn from Adsense.

Never stay outdated!!! Google’s policies are constantly changing. It will help if you know what changes are taking place in the world of Adsense so that you can update your sites if required.


If you get banned by Adsense for whatever reason you cannot give the excuse that you were “not aware” of the policy. This will not be of much help. So know the waters that you tread on!

Monday 13 April 2009

BIOS Beep Codes

When a computer is first turned on, or rebooted, its BIOS performs a power-on self test (POST) to test the system's hardware, checking to make sure that all of the system's hardware components are working properly. Under normal circumstances, the POST will display an error message; however, if the BIOS detects an error before it can access the video card, or if there is a problem with the video card, it will produce a series of beeps, and the pattern of the beeps indicates what kind of problem the BIOS has detected.
Because there are many brands of BIOS, there are no standard beep codes for every BIOS.

The two most-used brands are AMI (American Megatrends International) and Phoenix.

Below are listed the beep codes for AMI systems, and here are the beep codes for Phoenix systems.


AMI Beep Codes

Beep Code Meaning
1 beep DRAM refresh failure. There is a problem in the system memory or the motherboard.
2 beeps Memory parity error. The parity circuit is not working properly.
3 beeps Base 64K RAM failure. There is a problem with the first 64K of system memory.
4 beeps System timer not operational. There is problem with the timer(s) that control functions on the motherboard.
5 beeps Processor failure. The system CPU has failed.
6 beeps Gate A20/keyboard controller failure. The keyboard IC controller has failed, preventing gate A20 from switching the processor to protect mode.
7 beeps Virtual mode exception error.
8 beeps Video memory error. The BIOS cannot write to the frame buffer memory on the video card.
9 beeps ROM checksum error. The BIOS ROM chip on the motherboard is likely faulty.
10 beeps CMOS checksum error. Something on the motherboard is causing an error when trying to interact with the CMOS.
11 beeps Bad cache memory. An error in the level 2 cache memory.
1 long beep, 2 short Failure in the video system.
1 long beep, 3 short A failure has been detected in memory above 64K.
1 long beep, 8 short Display test failure.
Continuous beeping A problem with the memory or video.


Phoenix Beep Codes

Phoenix uses sequences of beeps to indicate problems. The "-" between each number below indicates a pause between each beep sequence. For example, 1-2-3 indicates one beep, followed by a pause and two beeps, followed by a pause and three beeps. Phoenix version before 4.x use 3-beep codes, while Phoenix versions starting with 4.x use 4-beep codes. Click here for AMI BIOS beep codes.
4-Beep Codes
Beep Code Meaning
1-1-1-3 Faulty CPU/motherboard. Verify real mode.
1-1-2-1 Faulty CPU/motherboard.
1-1-2-3 Faulty motherboard or one of its components.
1-1-3-1 Faulty motherboard or one of its components. Initialize chipset registers with initial POST values.
1-1-3-2 Faulty motherboard or one of its components.
1-1-3-3 Faulty motherboard or one of its components. Initialize CPU registers.
1-1-3-2
1-1-3-3
1-1-3-4 Failure in the first 64K of memory.
1-1-4-1 Level 2 cache error.
1-1-4-3 I/O port error.
1-2-1-1 Power management error.
1-2-1-2
1-2-1-3 Faulty motherboard or one of its components.
1-2-2-1 Keyboard controller failure.
1-2-2-3 BIOS ROM error.
1-2-3-1 System timer error.
1-2-3-3 DMA error.
1-2-4-1 IRQ controller error.
1-3-1-1 DRAM refresh error.
1-3-1-3 A20 gate failure.
1-3-2-1 Faulty motherboard or one of its components.
1-3-3-1 Extended memory error.
1-3-3-3
1-3-4-1
1-3-4-3 Error in first 1MB of system memory.
1-4-1-3
1-4-2-4 CPU error.
1-4-3-1
2-1-4-1 BIOS ROM shadow error.
1-4-3-2
1-4-3-3 Level 2 cache error.
1-4-4-1
1-4-4-2
2-1-1-1 Faulty motherboard or one of its components.
2-1-1-3
2-1-2-1 IRQ failure.
2-1-2-3 BIOS ROM error.
2-1-2-4
2-1-3-2 I/O port failure.
2-1-3-1
2-1-3-3 Video system failure.
2-1-1-3
2-1-2-1 IRQ failure.
2-1-2-3 BIOS ROM error.
2-1-2-4 I/O port failure.
2-1-4-3
2-2-1-1 Video card failure.
2-2-1-3
2-2-2-1
2-2-2-3 Keyboard controller failure.
2-2-3-1 IRQ error.
2-2-4-1 Error in first 1MB of system memory.
2-3-1-1
2-3-3-3 Extended memory failure.
2-3-2-1 Faulty motherboard or one of its components.
2-3-2-3
2-3-3-1 Level 2 cache error.
2-3-4-1
2-3-4-3 Motherboard or video card failure.
2-3-4-1
2-3-4-3
2-4-1-1 Motherboard or video card failure.
2-4-1-3 Faulty motherboard or one of its components.
2-4-2-1 RTC error.
2-4-2-3 Keyboard controller error.
2-4-4-1 IRQ error.
3-1-1-1
3-1-1-3
3-1-2-1
3-1-2-3 I/O port error.
3-1-3-1
3-1-3-3 Faulty motherboard or one of its components.
3-1-4-1
3-2-1-1
3-2-1-2 Floppy drive or hard drive failure.
3-2-1-3 Faulty motherboard or one of its components.
3-2-2-1 Keyboard controller error.
3-2-2-3
3-2-3-1
3-2-4-1 Faulty motherboard or one of its components.
3-2-4-3 IRQ error.
3-3-1-1 RTC error.
3-3-1-3 Key lock error.
3-3-3-3 Faulty motherboard or one of its components.
3-3-3-3
3-3-4-1
3-3-4-3
3-4-1-1
3-4-1-3
3-4-2-1
3-4-2-3
3-4-3-1
3-4-4-1
3-4-4-4 Faulty motherboard or one of its components.
4-1-1-1 Floppy drive or hard drive failure.
4-2-1-1
4-2-1-3
4-2-2-1 IRQ failure.
4-2-2-3
4-2-3-1
4-2-3-3
4-2-4-1 Faulty motherboard or one of its components.
4-2-4-3 Keyboard controller error.
4-3-1-3
4-3-1-4
4-3-2-1
4-3-2-2
4-3-3-1
4-3-4-1
4-3-4-3 Faulty motherboard or one of its components.
4-3-3-2
4-3-3-4 IRQ failure.
4-3-3-3
4-3-4-2 Floppy drive or hard drive failure.
3-Beep Codes
Beep Code Meaning
1-1-2 Faulty CPU/motherboard.
1-1-3 Faulty motherboard/CMOS read-write failure.
1-1-4 Faulty BIOS/BIOS ROM checksum error.
1-2-1 System timer not operational. There is a problem with the timer(s) that control functions on the motherboard.
1-2-2
1-2-3 Faulty motherboard/DMA failure.
1-3-1 Memory refresh failure.
1-3-2
1-3-3
1-3-4 Failure in the first 64K of memory.
1-4-1 Address line failure.
1-4-2 Parity RAM failure.
1-4-3 Timer failure.
1-4-4 NMI port failure.
2-_-_ Any combination of beeps after 2 indicates a failure in the first 64K of memory.
3-1-1 Master DMA failure.
3-1-2 Slave DMA failure.
3-1-3
3-1-4 Interrupt controller failure.
3-2-4 Keyboard controller failure.
3-3-1
3-3-2 CMOS error.
3-3-4 Video card failure.
3-4-1 Video card failure.
4-2-1 Timer failure.
4-2-2 CMOS shutdown failure.
4-2-3 Gate A20 failure.
4-2-4 Unexpected interrupt in protected mode.
4-3-1 RAM test failure.
4-3-3 Timer failure.
4-3-4 Time of day clock failure.
4-4-1 Serial port failure.
4-4-2 Parallel port failure.
4-4-3 Math coprocessor.

Convert FLV to 3GP, AVI, MPEG, WMV, MP3, MP4

May be friends have a download file (flash video files) from youtube and want to change it to 3GP format, so be on your mobile phone. Or want to change the flv format to AVI, MPEG, WMV, MP3, MP4, the free software Flash Free Flv Video Converter you can use. File Size installer about 4 MB, you can download here flv converter

Free Flash Flv Video Converter is a free software that can convert flash file (flv) to other video and audio formats such as 3GP, AVI, MPEG, WMV, MP3, MP4. Even if the software is free, but the facilities provided are complete enough, it is very easy to use and results of conversion is quite good.

To convert flv files to another video format, see the following procedures:

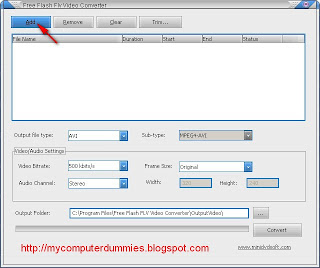
1. Open (activate) the application Free Flash Video Converter Flv
2. After the following display appears, click the Add button


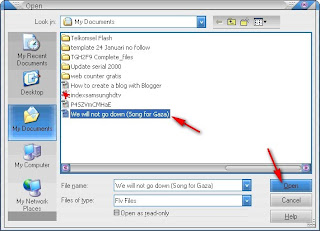
3. Select the video file that you want to flash conversion
Example: We will not go down (Song for Gaza). Flv
Click the Open button

flv converter
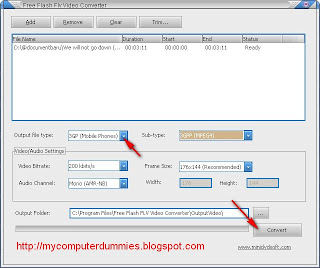
4. Flv file after the entry in the list (see the blue box)
In the Output file type, select the video file format you want
In this example I choose: 3GP (Mobile Phone)
Click the Convert button


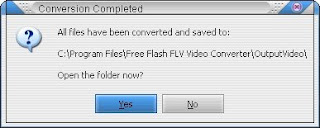
5. After the conversion process is complete dialog box will appear below
Click the Yes button to view the folder where the converted file.


Tuesday 7 April 2009

Create shortcut key in the toolbar

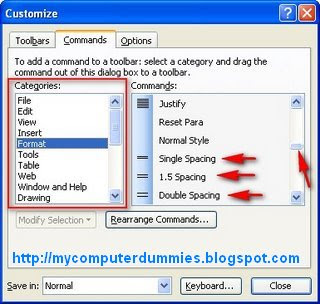
Here is how to create shorcut in the toolbar buttons to set the paragraph

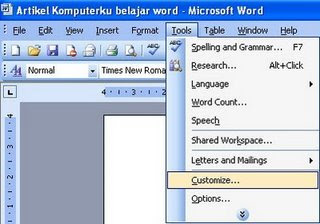
1. On the menu bar select Tools => Customize


2. In the dialog box Custumize
In Categories select Format
At the command-click and drag the button to the toolbar Single spacing
Do click and drag on the key spacing and 1.5 Double spacing


3. the result will look like below


Monday 6 April 2009

Clean up the windows registry file using free registry cleaner (freeware)

In addition to clean up garbage files windows, software CCleaner (freeware) can also be used to clean the windows registry file, fix windows registry . If you do not have the installer file of CCleaner, can be downloaded here Free registry cleaner


CCleaner is a freeware PC optimization tool.It combines a system cleaner that removes unused and temporary files from your system and also a fully featured registry cleaner. CCleaner allows Windows to run faster, more efficiently and gives you more hard disk space.

CCleaner uses an advanced Registry Cleaner to check for problems and inconsistencies. It can check the following:

* File Extensions
* ActiveX Controls
* ClassIDs
* ProgIDs
* Uninstallers
* Shared DLLs
* Fonts
* Help File references
* Application Paths
* Icons
* Invalid Shortcuts and more


If your computer has been installed CCleaner, can do the following procedures:

1. Open the application CCleaner
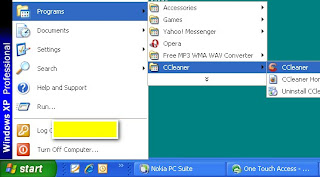
Start -> Programs -> CCleaner -> CCleaner


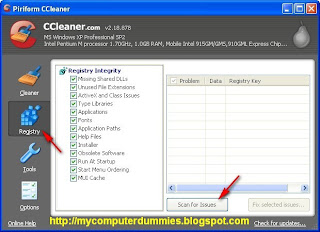
2. In the CCleaner click the Registry
Click the Scan for Issues


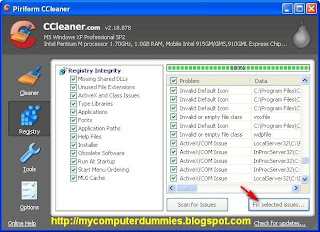
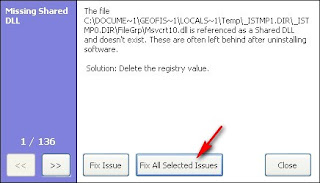
3. Click the "Fix Selected Issues"


4. Click the "Fix All Selected Issues"
Wait until the process is complete.


Clean up junk file using CCleaner

By using CCleaner (freeware) you can clean up trash Windows file. Usage is very easy and the result is quite satisfactory. You should do first is to install to your computer. If you do not have the installer file (master file) CCleaner, can be downloaded here

Use the procedure is as follows:
1. Open the application CCleaner
Start -> Programs -> CCleaner -> CCleaner


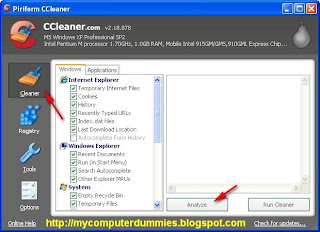
2. In the CCleaner window click the Cleaner button
Click the Analyze button


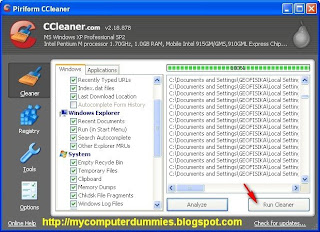
3. After analyze the process is complete click Run Cleaner button


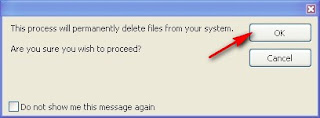
4. Click the OK button to delete a junk file permanently from the your hard drive


Random Posts