List of drivers and updates for windows from Microsoft and other companies :
MDAC 2.8
Microsoft Data Access Components (MDAC) 2.8 contains core Data Access components such as the Microsoft SQL Server™ OLE DB provider and ODBC driver.
Windows XP Home Edition Utility: Setup Disks for Floppy Boot Install
The Windows XP startup disk allows computers without a bootable CD-ROM to perform a new installation of the operating system. The Windows XP startup disk will automatically load the correct drivers to gain access to the CD-ROM drive and start a new installation of Setup.
Showing posts with label Windows XP Tips and Tricks. Show all posts
Showing posts with label Windows XP Tips and Tricks. Show all posts
Wednesday, 10 March 2010

Sunday, 7 March 2010
How to install photo gadgets on the desktop
Maybe a friend who often saw a gadget photo on a desktop computer, where the image can be shifted or replaced with a photo of the computer owner or photos / other images.
Here are some free applications ( forum / website version), the file size of about 1 MB. There are several forms of frame such as tennis, football, golf, etc..
If you are interested in using it:
Here are some free applications ( forum / website version), the file size of about 1 MB. There are several forms of frame such as tennis, football, golf, etc..
If you are interested in using it:
Tuesday, 16 February 2010
Free download sata driver for Intel(R) Matrix Storage RAID Controllers and AHCI Controllers for windows XP
The Intel(R) Matrix Storage Manager is designed to provide
functionality for the following Storage Controllers:
RAID Controllers:
- Intel(R) ICH8M-E/ICH9M-E SATA RAID Controller
- Intel(R) ICH8R/ICH9R/ICH10R/DO SATA RAID Controller
- Intel(R) ESB2 SATA RAID Controller
- Intel(R) ICH7MDH SATA RAID Controller
- Intel(R) ICH7R/DH SATA RAID Controller
AHCI Controllers:
- Intel(R) ICH10D/DO SATA AHCI Controller
- Intel(R) ICH10R SATA AHCI Controller
- Intel(R) EP80579 SATA AHCI Controller
- Intel(R) ICH9M-E/M SATA AHCI Controller
- Intel(R) ICH9R/DO/DH SATA AHCI Controller
- Intel(R) ICH8M-E/M SATA AHCI Controller
- Intel(R) ICH8R/DH/DO SATA AHCI Controller
- Intel(R) ESB2 SATA AHCI Controller
- Intel(R) ICH7M/MDH SATA AHCI Controller
- Intel(R) ICH7R/DH SATA AHCI Controller
This RAID/AHCI Controller is valid for the products listed below.
Intel® 3 Series Chipsets
Intel® 4 Series Chipset
Intel® 5000P Chipset
Intel® 5000V Chipset
Intel® 5000X Chipset
Intel® 945 Express Chipset Family
Intel® 955X Express Chipset
Intel® 965 Express Chipset Family
Intel® 975X Express Chipset
Intel® E7230 Chipset
Intel® Rapid Storage Technology
Intel® X58 Express Chipset
Mobile Intel® 4 Series Express Chipset Family
Mobile Intel® 945 Express Chipset Family
Mobile Intel® 965 Express Chipset Family
Download here SATA driver for windows XP
functionality for the following Storage Controllers:
RAID Controllers:
- Intel(R) ICH8M-E/ICH9M-E SATA RAID Controller
- Intel(R) ICH8R/ICH9R/ICH10R/DO SATA RAID Controller
- Intel(R) ESB2 SATA RAID Controller
- Intel(R) ICH7MDH SATA RAID Controller
- Intel(R) ICH7R/DH SATA RAID Controller
AHCI Controllers:
- Intel(R) ICH10D/DO SATA AHCI Controller
- Intel(R) ICH10R SATA AHCI Controller
- Intel(R) EP80579 SATA AHCI Controller
- Intel(R) ICH9M-E/M SATA AHCI Controller
- Intel(R) ICH9R/DO/DH SATA AHCI Controller
- Intel(R) ICH8M-E/M SATA AHCI Controller
- Intel(R) ICH8R/DH/DO SATA AHCI Controller
- Intel(R) ESB2 SATA AHCI Controller
- Intel(R) ICH7M/MDH SATA AHCI Controller
- Intel(R) ICH7R/DH SATA AHCI Controller
This RAID/AHCI Controller is valid for the products listed below.
Intel® 3 Series Chipsets
Intel® 4 Series Chipset
Intel® 5000P Chipset
Intel® 5000V Chipset
Intel® 5000X Chipset
Intel® 945 Express Chipset Family
Intel® 955X Express Chipset
Intel® 965 Express Chipset Family
Intel® 975X Express Chipset
Intel® E7230 Chipset
Intel® Rapid Storage Technology
Intel® X58 Express Chipset
Mobile Intel® 4 Series Express Chipset Family
Mobile Intel® 945 Express Chipset Family
Mobile Intel® 965 Express Chipset Family
Download here SATA driver for windows XP
Tuesday, 9 February 2010
Microsoft NET Famework 3.5 Service Pack 1 (SP1)
Microsoft.NET Framework version 3.5 Service Pack 1 provides the following new features and improvements:
* ASP.NET Dynamic Data, which provides a rich scaffolding framework that enables rapid data driven development without writing code, and a new addition to ASP.NET AJAX that provides support for managing browser history (back button support).
* Core improvements to the CLR (common language runtime) that include better layout of .NET Framework native images, opting out of strong-name verification for fully trusted assemblies, improved application startup performance, better generated code that improves end-to-end application execution time, and opting managed code to run in ASLR (Address Space Layout Randomization) mode if supported by the operating system. Additionally, managed applications that are opened from network shares have the same behavior as native applications by running with full trust.
* ASP.NET Dynamic Data, which provides a rich scaffolding framework that enables rapid data driven development without writing code, and a new addition to ASP.NET AJAX that provides support for managing browser history (back button support).
* Core improvements to the CLR (common language runtime) that include better layout of .NET Framework native images, opting out of strong-name verification for fully trusted assemblies, improved application startup performance, better generated code that improves end-to-end application execution time, and opting managed code to run in ASLR (Address Space Layout Randomization) mode if supported by the operating system. Additionally, managed applications that are opened from network shares have the same behavior as native applications by running with full trust.
Wednesday, 18 November 2009
Various boot disk (freeware)
Various boot disk you can use to repair your windows if at any time through error
1. Bootable disk from windows
2. Free boot disk from bootdisk.com
3. Free boot disk from freepctech.com
4. Free boot disk from answersthatwork.com
5. Bootable CD Windows XP From Microsoft (size 4.4 MB)
Windows XP Home Edition
Windows XP Home Edition SP1
Windows XP Professional SP1
Windows XP Home Edition SP2
Windows XP Professional SP2
Download here Bootable CD Windows XP
MS-DOS 6.2 Step-up Files (size 2.5 MB)
http://www.microsoft.com/downloads/details.aspx?FamilyID=96CC3197-B7E5-4B31-BADB-DDAAC771295F&displayLang=en
1. Bootable disk from windows
2. Free boot disk from bootdisk.com
3. Free boot disk from freepctech.com
4. Free boot disk from answersthatwork.com
5. Bootable CD Windows XP From Microsoft (size 4.4 MB)
Windows XP Home Edition
Windows XP Home Edition SP1
Windows XP Professional SP1
Windows XP Home Edition SP2
Windows XP Professional SP2
Download here Bootable CD Windows XP
MS-DOS 6.2 Step-up Files (size 2.5 MB)
http://www.microsoft.com/downloads/details.aspx?FamilyID=96CC3197-B7E5-4B31-BADB-DDAAC771295F&displayLang=en
Monday, 19 October 2009
How to set the display of the taskbar
You can set the display of the taskbar. kept appearing on the desktop or make it autohide.
To change the display from the taskbar to autohide or peramanent, do the following:
1. Right-click on the taskbar, select Properties

2. In the following dialog box, set:

a. lock the taskbar, lock the taskbar that will not be moved. If disable, then you can drag the taskbar to another position, could drag upward or to the side of the desktop
b. Autohide the taskbar (to make the taskbar is hidden, if the mouse pointer is in position the taskbar (the bottom of the desktop), then the taskbar will appear if the mouse was in pointer other position the taskbar will be hidden by windows.
c. Show QuickLaunch. To create QuickLaunch. QuickLaunch icon can be filled with shortcuts, to speed up opening applications (just drag the shortcut icon on the desktop, and enter into the QuickLaunch bar (usually its position on the taskbar beside the Start button)
3. You can press the Customize button above to set the icon to be displayed on the taskbar.
References : Artikel Komputer
To change the display from the taskbar to autohide or peramanent, do the following:
1. Right-click on the taskbar, select Properties

2. In the following dialog box, set:

a. lock the taskbar, lock the taskbar that will not be moved. If disable, then you can drag the taskbar to another position, could drag upward or to the side of the desktop
b. Autohide the taskbar (to make the taskbar is hidden, if the mouse pointer is in position the taskbar (the bottom of the desktop), then the taskbar will appear if the mouse was in pointer other position the taskbar will be hidden by windows.
c. Show QuickLaunch. To create QuickLaunch. QuickLaunch icon can be filled with shortcuts, to speed up opening applications (just drag the shortcut icon on the desktop, and enter into the QuickLaunch bar (usually its position on the taskbar beside the Start button)
3. You can press the Customize button above to set the icon to be displayed on the taskbar.
References : Artikel Komputer
Monday, 12 October 2009
Create a screen saver with writing your own name
Screen saver is one of the inherent application windows. Where, if in a given time interval there is no activity on your computer automatically switches the screen saver.
This application can also activate and These applications can be enabled and you can also disabled.
Steps to create a screen saver:
1.Right click on your desktop, select Properties

2. to display the Properties dialog box click the screen saver tab
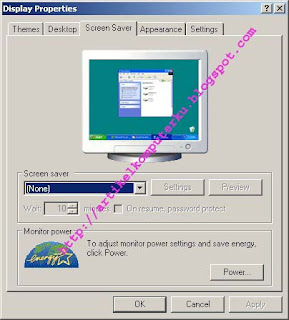
3. On the screen saver click the down arrow button, select 3D Text, click the Settings button
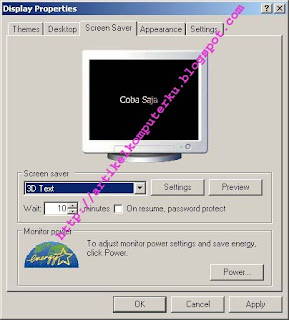
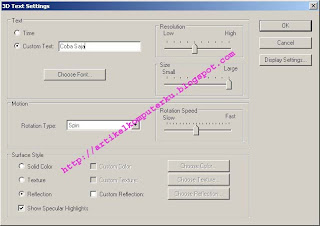
4. Set some optian, in the custom text type your name, click the OK button
5. In the display properties dialog box click the OK button
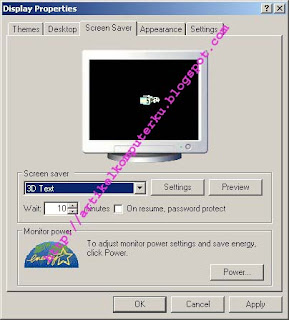
Please see the results, ..... you can use other types of screen savers.
You can also install other screen savers, many sites that provide free screen saver, you just need to ask for help Mr. google, and use the keyword "free screen saver" after you download, usually must be installed, then automatically included in the list of screen savers in the Properties dialog box.
Refrernces : Artikel Komputer
This application can also activate and These applications can be enabled and you can also disabled.
Steps to create a screen saver:
1.Right click on your desktop, select Properties

2. to display the Properties dialog box click the screen saver tab

3. On the screen saver click the down arrow button, select 3D Text, click the Settings button

4. Set some optian, in the custom text type your name, click the OK button

5. In the display properties dialog box click the OK button

Please see the results, ..... you can use other types of screen savers.
You can also install other screen savers, many sites that provide free screen saver, you just need to ask for help Mr. google, and use the keyword "free screen saver" after you download, usually must be installed, then automatically included in the list of screen savers in the Properties dialog box.
Refrernces : Artikel Komputer
Saturday, 10 October 2009
How to Create a shortcut on the Desktop
Here is how to create shortcut icons on the desktop, to help us not to open the menu star again, because just by double-clicking on the icon so we can immediately activate the application.
For example a calculator shortcut on the desktop:
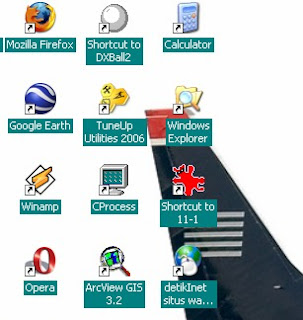
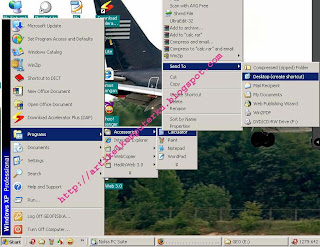
1. Because the calculator application already exists in the Start menu, then you only need to open the Start menu, then select the calculator, then right click on the calculator, select Send To -> Desktop (create shortcut)
, then the desktop will automatically appear in the calculator icon.
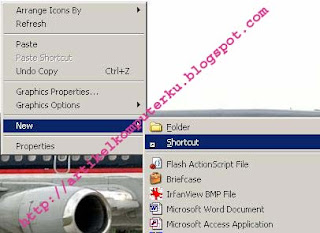
2. if the application was not in the startmenu, then you must create it manually, let's say we'll make icon PC Media Antivirus
a. Right-click on the desktop, select New -> Shortcut
b. Wait until the following dialog box appears (Create shortcut), click Browse, the browse dialog box for the folder click on C: click on the directory that contains files PC media,
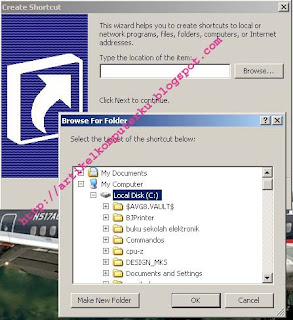
c. Select berextensi file *. exe (executable file) that is: PVMAV-CLN
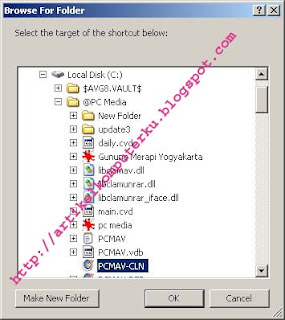
d. Click the OK button, the shortcut will appear on the desktop.
3. You can also create a shortcut key icon,
For example create a shortcut key calculator
a. Right click the calculator icon, click properties

b. Then will appear the following dialog box:
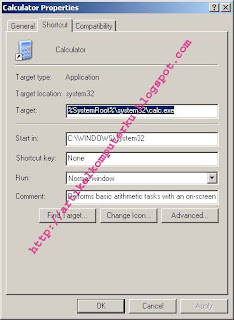
c. click on textbox "None" on the right side of the writing shortcut key, press "Alt" (on your computer keyboard) is automatically written "None" changed to "Ctrl + Alt +", press the C key (you can use the other buttons) it would appear The following dialog box
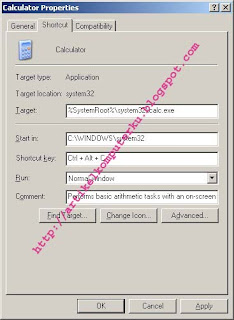
d. Change the dialog box icon, click OK

e. calulator on the Properties dialog box, click OK
You've successfully created a shortcut key calculator, please press three keys Ctrl + Alt + C (without the +) simultaneously. if successful then the application will appear in your desktop calculator.
If you want to make another application shourcut key you must use another key combination (Ctr + Alt + "in addition to C").
References: Artikel Komputer
For example a calculator shortcut on the desktop:

1. Because the calculator application already exists in the Start menu, then you only need to open the Start menu, then select the calculator, then right click on the calculator, select Send To -> Desktop (create shortcut)
, then the desktop will automatically appear in the calculator icon.

2. if the application was not in the startmenu, then you must create it manually, let's say we'll make icon PC Media Antivirus
a. Right-click on the desktop, select New -> Shortcut

b. Wait until the following dialog box appears (Create shortcut), click Browse, the browse dialog box for the folder click on C: click on the directory that contains files PC media,

c. Select berextensi file *. exe (executable file) that is: PVMAV-CLN

d. Click the OK button, the shortcut will appear on the desktop.
3. You can also create a shortcut key icon,
For example create a shortcut key calculator
a. Right click the calculator icon, click properties

b. Then will appear the following dialog box:

c. click on textbox "None" on the right side of the writing shortcut key, press "Alt" (on your computer keyboard) is automatically written "None" changed to "Ctrl + Alt +", press the C key (you can use the other buttons) it would appear The following dialog box

d. Change the dialog box icon, click OK

e. calulator on the Properties dialog box, click OK
You've successfully created a shortcut key calculator, please press three keys Ctrl + Alt + C (without the +) simultaneously. if successful then the application will appear in your desktop calculator.
If you want to make another application shourcut key you must use another key combination (Ctr + Alt + "in addition to C").
References: Artikel Komputer
How to Change Desktop Background (Wallpaper)
Sometimes the desktop display can be boring if the color and monotone images.
Here's how to change the look of your desktop computer screen
1. Using built in windows file
a. Right-click on the desktop, click Properties

b. In the Display Properties dialog box, select the Desktop tab

c. In the Background list select Windows XP, click Apply then preview the results seen in the dialog box, then choose another background, such as "stone henge" then see the changes. if you are happy with the new look please press the Apply button, then OK, automatically display will change your desktop.

2. If you are not satisfied with the picture, maybe you have a good picture in your hard drive you can use it as your dektop background. The following example is a cat picture
do the following:
a. in the Display Properties dialog box, click the browse button, the dialog box will appear browse, search directory that contains the cat picture

b. Select persia2 cat pictures, press the open button, it will appear the following dialog box:

c. There are several options to adjust the position of image display (you can see below the browse button) the tile, center, and stretch. Select only background view strecth to automatically adjust the size of your computer screen.
d. Then press OK, then your desktop now have a cat picture.
Some other applications that you can use to create a desktop background (wallpaper) is:
ACDSee, Irfan View, Paint, and other graphics applications, if you do not have the application please use the above way.
References: Artikel Komputer
Here's how to change the look of your desktop computer screen
1. Using built in windows file
a. Right-click on the desktop, click Properties

b. In the Display Properties dialog box, select the Desktop tab

c. In the Background list select Windows XP, click Apply then preview the results seen in the dialog box, then choose another background, such as "stone henge" then see the changes. if you are happy with the new look please press the Apply button, then OK, automatically display will change your desktop.

2. If you are not satisfied with the picture, maybe you have a good picture in your hard drive you can use it as your dektop background. The following example is a cat picture
do the following:
a. in the Display Properties dialog box, click the browse button, the dialog box will appear browse, search directory that contains the cat picture

b. Select persia2 cat pictures, press the open button, it will appear the following dialog box:

c. There are several options to adjust the position of image display (you can see below the browse button) the tile, center, and stretch. Select only background view strecth to automatically adjust the size of your computer screen.
d. Then press OK, then your desktop now have a cat picture.
Some other applications that you can use to create a desktop background (wallpaper) is:
ACDSee, Irfan View, Paint, and other graphics applications, if you do not have the application please use the above way.
References: Artikel Komputer
How to know the specification of computer hardware
By using the software, we can find the computer hardware specifications that are used. There are several ways to find out is by using system properties, direcx diagnostic tools, or use a third-party applications such as cpu-z, etc..
I. Using the DirectX diagnostic tool (built in windows application )
If your computer has not installed cpu-z software, you can use this way
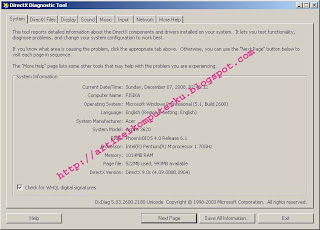
a. In the startmenu select run, type dxdiag, and press OK
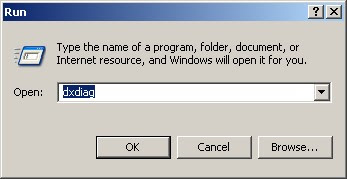
b. Wait until the dialog box appears ,
On the system tab there is information that is used OS, BIOS, Moteherboard, Memory
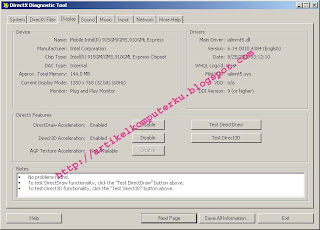
On the Display tab there is information display device (VGA)
On another tab there is information decice Sound, Network, etc.
c. The information display device (VGA)
II. This way better, than the first way, but you must have cpu-z applications on your computer.
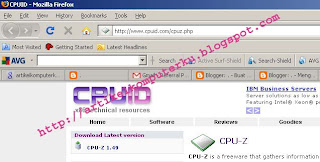
a. If not, you can download it at http://www.cpuid.com/cpuz.php
click Download Latestt version (to download the latest version)
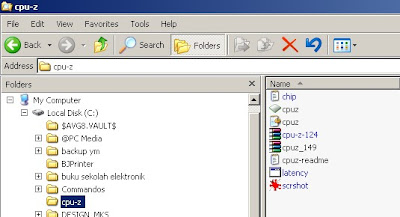
b. Extract the downloaded file to unzip it (winrar). Click cpuz.exe to activate cpuz
c. Will appear the information about the CPU (processor), Mainboard, Memory (select the tab of each category to see the specification details)
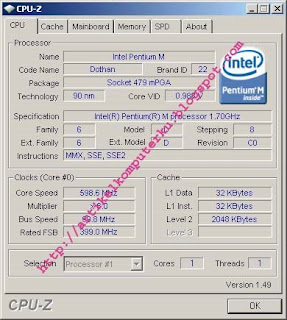
References: Artikel Komputer
I. Using the DirectX diagnostic tool (built in windows application )
If your computer has not installed cpu-z software, you can use this way
a. In the startmenu select run, type dxdiag, and press OK

b. Wait until the dialog box appears ,
On the system tab there is information that is used OS, BIOS, Moteherboard, Memory
On the Display tab there is information display device (VGA)
On another tab there is information decice Sound, Network, etc.

c. The information display device (VGA)

II. This way better, than the first way, but you must have cpu-z applications on your computer.
a. If not, you can download it at http://www.cpuid.com/cpuz.php
click Download Latestt version (to download the latest version)

b. Extract the downloaded file to unzip it (winrar). Click cpuz.exe to activate cpuz

c. Will appear the information about the CPU (processor), Mainboard, Memory (select the tab of each category to see the specification details)

References: Artikel Komputer
Thursday, 8 October 2009
How to enable (backup) system restore windows
One of the facilities available in the windows is the system restore tools. The function of System Restore is to backup (make a backup / copy) your Windows system files.
The benefits you will gain if enable system restore on your computer, is to help you restore the windows (if there was an error / conflict) to its original state. So if there is damage to the windows system files on your computer then you can still use the system restore to cure your computer. (a bit more to save time) when compared to reinstall windows. But not all damage to your windows system can be restored, if the damage is likely to be fatal it can not be restored anymore, so one of the main ways to improve the way the windows are installed.
Losses would you get if you enable system restore:
Your computer hard disk space will be allocated by the windows to save the backup file system (depending on the changes and update your windows system files), but this is not a problem if the hard disk capacity is still large.
If you want to activate the system restore, do the following:
1. At the start menu select:
Start => Programs => Accessories => System Tools => System Restore
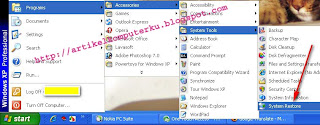
2. click system restore settings
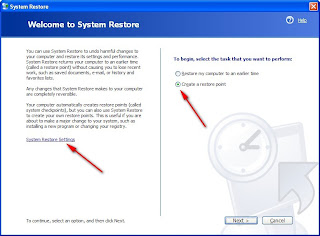
3. select the drive (partition) to be the backup
if your window system installed on drive C, then disable all other drives monitoring (D, E).
This meant that the backup file size not too big, and not drain the resources to monitor all the windows drive. because that would in essence is a system backup windows only.

4. click on drive E, then in the dialog box derikut check turn off system restore on this drive. click OK (do step 3 and 4 on the other drives)

5. In the next dialog box click on "Create a restore point
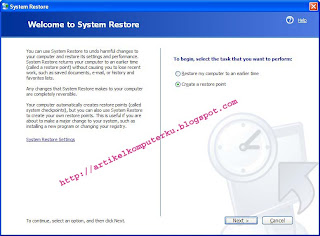
6. the textbox Restore point description, type the name or description of your restore point (just type in the date backupnya)
click the create button
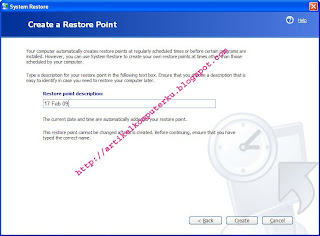
7. If successful the following message appears successful
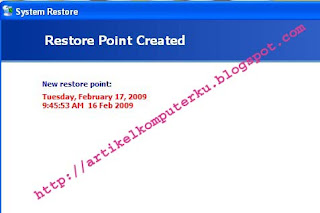
8. if a window of time you have problems, can make improvements by using system restore
(do steps 1 and 2, note: in step 2 select "mycomputer restore to earlier time")
after the following dialog box appears select the date of backup restore points available, the date is usually somewhat thicker than the other dates)
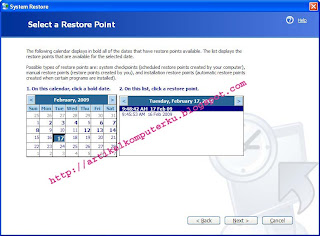
click next, it will begin the process of repair windows system, restart the computer after a successful.
Tips:
Do not be too much to make a restore point, because it will drain your hard disk space, if too many restore points, can be removed in part, is 1 or two restore points in a month. (Select the best restore points / at the time of backup windows are stable).
References: Artikel Komputer
The benefits you will gain if enable system restore on your computer, is to help you restore the windows (if there was an error / conflict) to its original state. So if there is damage to the windows system files on your computer then you can still use the system restore to cure your computer. (a bit more to save time) when compared to reinstall windows. But not all damage to your windows system can be restored, if the damage is likely to be fatal it can not be restored anymore, so one of the main ways to improve the way the windows are installed.
Losses would you get if you enable system restore:
Your computer hard disk space will be allocated by the windows to save the backup file system (depending on the changes and update your windows system files), but this is not a problem if the hard disk capacity is still large.
If you want to activate the system restore, do the following:
1. At the start menu select:
Start => Programs => Accessories => System Tools => System Restore

2. click system restore settings

3. select the drive (partition) to be the backup
if your window system installed on drive C, then disable all other drives monitoring (D, E).
This meant that the backup file size not too big, and not drain the resources to monitor all the windows drive. because that would in essence is a system backup windows only.

4. click on drive E, then in the dialog box derikut check turn off system restore on this drive. click OK (do step 3 and 4 on the other drives)

5. In the next dialog box click on "Create a restore point

6. the textbox Restore point description, type the name or description of your restore point (just type in the date backupnya)
click the create button

7. If successful the following message appears successful

8. if a window of time you have problems, can make improvements by using system restore
(do steps 1 and 2, note: in step 2 select "mycomputer restore to earlier time")
after the following dialog box appears select the date of backup restore points available, the date is usually somewhat thicker than the other dates)

click next, it will begin the process of repair windows system, restart the computer after a successful.
Tips:
Do not be too much to make a restore point, because it will drain your hard disk space, if too many restore points, can be removed in part, is 1 or two restore points in a month. (Select the best restore points / at the time of backup windows are stable).
References: Artikel Komputer
How to Change the name of the owner registration at system properties
Maybe you've asked for help to someone else to install windows on your computer. Or you enter the wrong name when installing Windows.Easy way to see the computer owner's name listed in the windows is to look at the system properties
Click the flag button + Pause Break
or Start => Settings => Control Panel => System
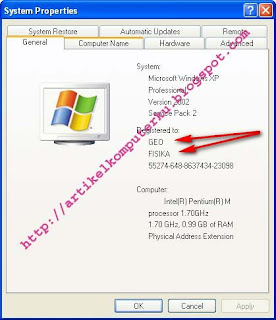
From the picture seemingly that:
a. name of the owner (owner): GEO (can be changed according to your name)
b. name of organization: PHYSICS
To change
name of the owner (owner) can do the following tips:
1. On the Start menu, select Run, type regedit

2. Actions are logged at the box open registry editor the following directory:
HKEY_LOCAL_MACHINE | Software | Microsoft | Windows NT | CurrentVersion

3. RegisteredOwner right click and select Modify

4. the value of data type your name

5. RegisteredOrganization right click and select Modify

6. the value data type the name of your organization or institution,

7. Restart your computer, open the system properties to see the changes.
References : Artikel Komputer
Click the flag button + Pause Break
or Start => Settings => Control Panel => System

From the picture seemingly that:
a. name of the owner (owner): GEO (can be changed according to your name)
b. name of organization: PHYSICS
To change
name of the owner (owner) can do the following tips:
1. On the Start menu, select Run, type regedit

2. Actions are logged at the box open registry editor the following directory:
HKEY_LOCAL_MACHINE | Software | Microsoft | Windows NT | CurrentVersion

3. RegisteredOwner right click and select Modify

4. the value of data type your name

5. RegisteredOrganization right click and select Modify

6. the value data type the name of your organization or institution,

7. Restart your computer, open the system properties to see the changes.
References : Artikel Komputer
How to uninstall / remove programs (applications) on windows
To unistall (remove) an application already installed on your computer, then one way is to find the uninstall shortcut, usually in the group folder in the start menu shortcut.
Suppose we'll remove AVG Antivirus application, then straight to the startmenu can then locate the folder shortcut .... click Uninstall AVG
AVG automatically be deleted from your computer ...
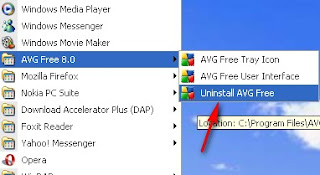
If at any time you have an application that has no uninstall shortcut in the startmenu, it could do under this alternative
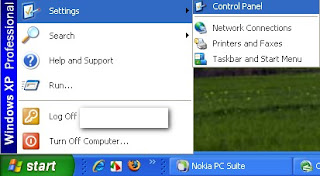
1. In the startmenu select Start => Settings => Control Panel
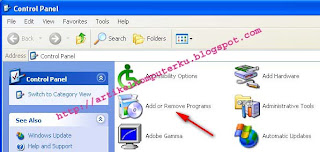
2. In the control panel dialog box click on "Add or Remove Programs
3. Select the Applications to be removed, for example, AVG Free 8, click the Change / Remove
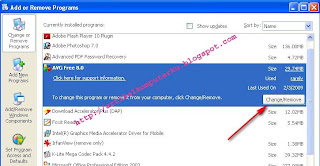
If the normal process, the application automatically will be deleted AVG
In addition to the above you can also use the application / third-party utility to do uninstall the program.
Sometimes there are applications that can not be removed (probably because of bugs or not compatible with windows) cause the application can not be uninstalled. For this case I will discuss in another occasion, essentially the way I normally do this through the elimination of windows registry
References: Artikel komputer
Suppose we'll remove AVG Antivirus application, then straight to the startmenu can then locate the folder shortcut .... click Uninstall AVG
AVG automatically be deleted from your computer ...

If at any time you have an application that has no uninstall shortcut in the startmenu, it could do under this alternative
1. In the startmenu select Start => Settings => Control Panel

2. In the control panel dialog box click on "Add or Remove Programs

3. Select the Applications to be removed, for example, AVG Free 8, click the Change / Remove

If the normal process, the application automatically will be deleted AVG
In addition to the above you can also use the application / third-party utility to do uninstall the program.
Sometimes there are applications that can not be removed (probably because of bugs or not compatible with windows) cause the application can not be uninstalled. For this case I will discuss in another occasion, essentially the way I normally do this through the elimination of windows registry
References: Artikel komputer
How to disable autorun or autoplay CD / DVD
Windows by default, enable autorun (autoplay) CD. You can make this setting is off. Usability gain if you disable this feature are:
1. Reducing the memory allocation for the handling of the CD autoplay feature, so the windows can take advantage of the memory allocation for applications / features, so you indirectly reduce the workload windows.
2. can help prevent your computer infected by a virus that is contained in the autorun CD
Disadvantages:
1. If you insert the CD into the CD / DVD player then the contents of the CD is not directly readable by the Multimedia Player (such as Winamp, Windows media player, etc.), to open it you must run the first Multimedia Player and then browse to the CD
2. If you insert the CD data to CD / DVD player then the contents of the CD is not directly readable by Windows Explorer, to open it you must run or click the icon CD / DVD
If you want to change the CD autoplay settings, do the following:
1. Open Windows Explorer
Right-click on the icon drive CD / DVD
Select Properties
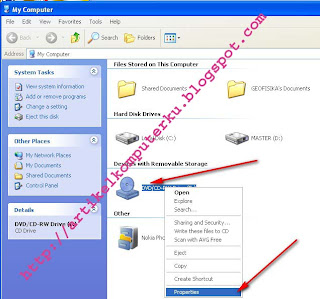
2. Select the Autoplay tab, click the "take no action"
Click Apply then OK
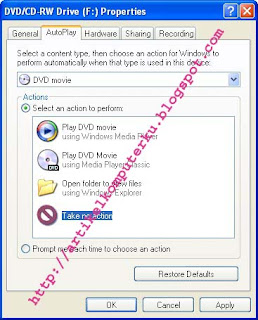
3. Reopen next dialog box CD / DVD Properties
Select Other fitur , such as pictures or music CDs
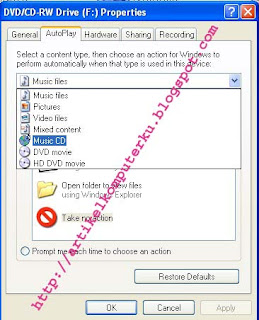
4. Select "take no action"
Click Apply, OK
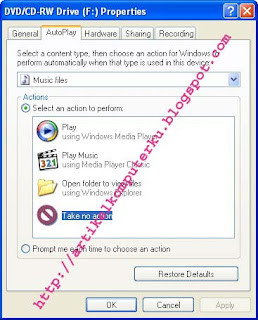
5. To restore to its original state simply click the restore default
References: Artikel Komputer
1. Reducing the memory allocation for the handling of the CD autoplay feature, so the windows can take advantage of the memory allocation for applications / features, so you indirectly reduce the workload windows.
2. can help prevent your computer infected by a virus that is contained in the autorun CD
Disadvantages:
1. If you insert the CD into the CD / DVD player then the contents of the CD is not directly readable by the Multimedia Player (such as Winamp, Windows media player, etc.), to open it you must run the first Multimedia Player and then browse to the CD
2. If you insert the CD data to CD / DVD player then the contents of the CD is not directly readable by Windows Explorer, to open it you must run or click the icon CD / DVD
If you want to change the CD autoplay settings, do the following:
1. Open Windows Explorer
Right-click on the icon drive CD / DVD
Select Properties

2. Select the Autoplay tab, click the "take no action"
Click Apply then OK

3. Reopen next dialog box CD / DVD Properties
Select Other fitur , such as pictures or music CDs

4. Select "take no action"
Click Apply, OK

5. To restore to its original state simply click the restore default
References: Artikel Komputer
Subscribe to:
Posts (Atom)