Monday, 28 December 2009

5 biggest data disaster in 2009

If there was anything even vaguely comforting about the data breaches that were announced this year, it was that many of them stemmed fsecurity Artwork: Chip Taylor rom familiar and downright mundane security failures.

Companies continued to be felled more by usual issues such as lost laptops, unpatched or poorly coded software, inadvertent disclosures and rogue insiders, rather than by sneaky new attack techniques or devastating new hacker tools.

Here's a look back at five of the more notable breaches of the year:


1. TSA: Lessons in Redaction

In what must arguably rank as one of the biggest security gaffes of this year, the Transportation Security Administration (TSA) accidentally posted on a public Web site a manual that contained complete details on its airport screening procedures.

The TSA manual included details for screening passengers, checking for explosives devices, special rules for handling the CIA, diplomats and law enforcement officials, and the technical settings and tolerances used by metal and explosive detectors used at airports.

The leak occurred when an improperly redacted TSA Standard Operations Procedures manual was posted on a federal Web site as part of a a contract bid solicitation process. Lawmakers called the gaffe "shocking" and "reckless," as wells as a threat to national security.


2. Heartland Payment Systems: Breach Poster Child

Heartland makes the list simply by virtue of the spectacular size and scope of the data breach it disclosed in January.

The compromise stemmed from SQL injection errors that allowed hackers to break into the payment processor's networks and steal data on approximately 130 million credit and debit cards over several months.

That number easily eclipsed the 94 million or so cards that were believed to have been compromised in the hack at TJX Companies Inc in 2007. It gave Heartland the dubious distinction of having announced the largest ever data breach in history.

3.Health Net: Delayed Disclosure

It was bad enough that Health Net of the Northeast Inc. lost a hard drive containing seven years worth of unencrypted personal, financial and medical information on about 1.5 million customers. What made the loss worse was that the company did not disclose it for nearly six months after the drive went missing.

Along with medical records, the hard drive contained names, addresses and Social Security numbers of Health Net customers from Arizona, Connecticut, New Jersey, and New York.

A new healthcare breach notification law that went into effect in November is designed to force companies to disclose such breaches sooner. But few are likely to do so because of a controversial "harm threshold" clause entered into the bill at the last moment.

4. U.S. GPO: Sharing Nuclear Secrets

In an incident highlighting some of the dangers of the push to open government, a document containing sensitive details on U.S. civilian nuclear sitesmarked as "Highly Confidential Safeguards Sensitive," by the President ended up being publicly posted on the Government Printing Office's Web site.

The document contained detailed information on hundreds of civilian nuclear sites in the country, including those storing enriched uranium. It listed details on programs at nuclear weapons research labs at Los Alamos, Livermore and Sandia and may have been posted because of differences in the way government agencies classify and handle official documents.

5. RockYou: Storing 32 Million Passwords in Plain Text

Social networking application vendor RockYou Inc. became a virtual shoo-in to this list earlier this week after a data breach exposed usernames and passwords for over 32 million registered members.

While the number alone make the breach noteworthy, what makes it even more so was the fact that RockYou kept all of the passwords in plain text.

Since RockYou requires users to register with their Webmail addresses, the hacker behind the breach now has data that allows access to millions of Webmail accounts (unless the users change them).

With a growing number of crooks trying to steal legitimate credentials to break into all sorts of online accounts, RockYou's failure to take even a basic precaution such as hashing passwords was notable to say the least.


http://www.pcworld.com/article/185176/2009s_top_5_data_disasters.html

Saturday, 26 December 2009

Top ten best website (Alexa version)

Below are 10 best websites based on assessment results from the alexa rank in December 2009, the list is to appear in the level of google while the bloggers are in a eight position to beat msn website


The list can be seen below

1. http://www.google.com/
2. http://www.facebook.com/
3. http://www.yahoo.com/
4. http://www.youtube.com
5. http://www.live.com/
6. http://www.wikipedia.org/
7. http://www.baidu.com/
8. http://www.blogger.com/
9. http://www.msn.com/
10. http://www.yahoo.co.jp/


References: Alexa rank


Friday, 25 December 2009

Free data compression software

This software can be freely used, copied, studied, modified, and redistributed by everyone that obtains a copy: “free software” or “open source software”. Typically, this means software which is distributed with a free software license, and whose source code is available to anyone who receives a copy of the software.


1. 7-Zip
2. ARJ
3. AdvanceCOMP
4. Ar (Unix)
5. Ark (computing)


6. Bzip2
7. DAR (Disk Archiver)
8. File Roller
9. FreeArc
10. Gzip

11. Info-ZIP
12. KGB Archiver
13. Keka
14. LZRW
15. Lempel-Ziv-Oberhumer

16. Lzop
17. P7zip
18. PAQ
19. PEA (file format)
20. PeaZip

21. Pngcrush
22. QUAD (compressor)
23. Reduced Offset Lempel Ziv
24. Rzip
25. UPX

26. The Unarchiver
27. Unrar
28. XAD (software)
29. XZ Utils
30. Xarchiver
31. Xz
32. Zlib

Sources: Wikipedia

Thursday, 24 December 2009

How to Change the System Properties Logo in Windows 7

Maybe there among my friends who had seen at the system properties attached logo, image or photograph owner of the computer. Actually you can install their own pictures or photos on your computer's system properties. You only need to change some registry setting your windows 7.

For example you can see like picture below, there are pictures cats under the Windows logo (you can replace the image with your image size 3 x 4 cm) or image size approximately 120 x120 pixels

Windows 7


To add an image in the system properties windows 7, do the following procedure:


A. Change the image format into a bmp, I considered a friend had a picture in bmp format, rename the file to OEMLogo (in bmp format: OEMLogo.bmp)
B. Copy the image OEMLogo to directory C:/Windows/System32 /
(C is the drive where windows is installed )


C. Setting the registry

Before you start editing the registry should be doing backups

1. in the search box, type regedit and then enter


2. open directory
HKEY_LOCAL_MACHINE \ SOFTWARE \ Microsoft \ Windows \ CurrentVersion \ OEMInformation
OEMInformation directory, create a new string
right-click popup menu will appear, select New -> string value

System Properties Logo
3. will come new value # 1, replace with Logo


4. You can also klikkanan the new value # 1 select rename, type (replace) new value # 1 type (replace) new value # 1 with Logo

System Properties Logo in Windows 7

6. double-click on the logo, the value of data type:
\ Windows \ system32 \ OEMLogo.bmp

Logo Windows 7

Click OK
Restart the computer, if successful will appear a new logo in system properties


How to Uninstall Tablet PC components at windows 7

Windows 7 provides component features a tablet PC, this feature works only if the type of computer you're using a tablet PC type, information about the tablet pc can be found here tablet pc. If you only use a PC (desktop) or a notebook, you better turn off the service or uninstall the tablet PC tablet pc components to improve windows 7 performance.

To uninstall the tablet PC in windows 7 can do the following procedure:


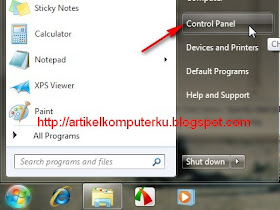
1. At the start menu, select Control Panel

Uninstall tablet PC
2. Select Programs

tablet PC Windows 7

3. Turn windows features on or off

turn off tablet pc

4. Remove the check mark on the tablet PC components
Click OK

improve windows 7

5. Wait until uninstall process is complete

windows 7 performance


How to disable autoplay (autorun) all media device in windows 7

Autoplay / autorun is one of the main features of windows that served to open the file in the data media (CD / Notebook External / Flashdisk, etc.) automatically. There are some weaknesses if you use / activate this feature:

1. If the CD / Notebook External / Flashdisk contains a virus so the virus can easily attack your computer through the features autorun / autoplay windows 7
2. Windows 7 will allocate memory for the feature autorun / autoplay, so that it can reduce the free space on your computer memory.

Actually you can turn off feature autorun / autoplay in windows 7. Here's how to disable autorun / autoplay in windows 7

1. In the start menu, select Control Panel


disable autoplay windows 7
2. Select hardware and sound

disable autorun windows 73. Select Autoplay

autorun windows 7

4. Disconnect / remove the check mark on "Use Autoplay for all media devices"
Click the Save button

turn off autoplay windows 7


How to disable UAC (User Account Control) in windows 7

User Account Control (UAC) is a security feature windows 7. Each time you access the files or application windows vista system will display a warning UAC confirmation of this security feature. This feature may be off (disable) so you do not interfere with windows often ask the user account control. Disabling UAC does not interfere with the performance of your windows 7.

user account control

To disable user account control in windows 7, do the following procedure:

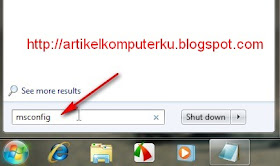
1. In the search box type msconfig then enter


disable UAC
2. Select tabulation Tools
Select Change UAC Settings
Click the Launch button

diasable uac windows 7

3. Move Slide the bar to Never notify

UAC Windows 7


Tuesday, 22 December 2009

Alexa rank

Alexa ranks sites based on tracking information of users of its Alexa Toolbar for Internet Explorer and from integrated sidebars in Mozilla and Netscape.
Once installed, the toolbar collects data on browsing behavior which is transmitted to the website where it is stored and analyzed and is the basis for the company's web traffic reporting.


There is some controversy over how representative Alexa's user base is of typical Internet behavior. If Alexa's user base is a fair statistical sample of the Internet user population . Alexa's ranking should be quite accurate. In reality, not much is known about the sample and possible sampling biases. Alexa itself notes several examples. A known source of bias is the self-selecting, opt-in nature of Alexa traffic tracking software installation, but the significance of this bias on rankings is not reported.


Source:
Wikipedia


Saturday, 19 December 2009

How to increase the speed of menu show and start menu in windows 7

By default, windows 7 automatically set the menu delay time on 400 ms. You can change more quickly so that when you move from one item to other item on the Start menu,will appear slightly faster than the standard speed. Changing this delay time (the menu show delay) will not damage your windows.

To change the menu show delay in order to look more quickly start menu can do the following procedure


1. In the search box type regedit, and then enter


menu show delay
2. Open the directory
Computer \ HKEY_CURRENT_USER \ Control Panel \ Desktop
Double click on the menu show delay in the dialog box that appears, change the value of data values from 400 to 0 or 1
Click OK

decrease menu show delay
3. Menu show delay will change as below

speed up star menu
Restart your computer.


How to change the size of virtual memory to improve windows 7 performance

One way to improve windows 7 performance that can speed up your windows 7 is to increase the virtual memory (virtual memory). Virtual memory is the additional memory that can be taken from space on your hard drive. Windows provides this facility to support or improve the performance of your computer (pc or notebook) . By default windows allocate space on your hard drive in accordance with the minimum limit, but you can apply the settings manually to further increase the virtual memory space on your computer. This virtual memory is used by windows automatically if there is physical memory management has been used by the application windows, even if too many applications are running, usually in the taskbar will show the message "low virtual memory ...".

Here is the procedure or how to increase virtual memory windows 7 or How to change the size of virtual memory to improve performance windows 7:


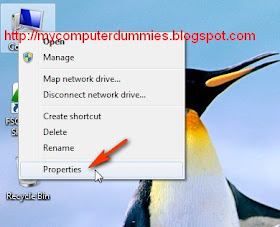
1. On desktop, right-click the computer icon select properties


change size virtual memory


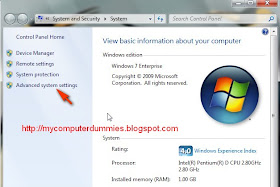
2. Select Advanced system settings

add virtual memory
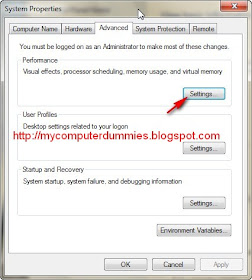
3. Select tabulation Advanced
Select the settings button ..

increase virtual memory windows 7
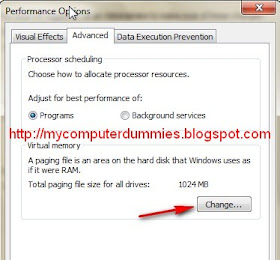
4. In the virtual memory , click change... button

virtual memory windows 7
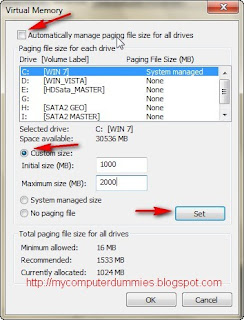
5. Remove the check "automatically manage paging file size for all drives
Select the custom size option
Complete the initial size (MB): 1000 (adjust the capacity of the empty space on your hard drive)
Fill in the maximum size (MB): 2000 (adjust the capacity of the empty space on your hard drive can be larger or smaller than the value )

setting virtual memory
Click the Set button

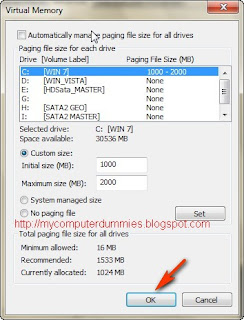
6. the result will look like the image below

windows 7 virtual memory
Select OK
Restart your computer


Tuesday, 15 December 2009

Philips secret codes

Below are a few secret codes of Philips mobile phones. You can use these Philips secret codes on your mobile phone
Note: There is some code that can only be used on mobile phone-type specific


Please try your code.
But damages that occur as a result of the phone you use this code outside of our responsibility.


Philips


1. * # 06 # Displays the IMEI number (International Mobile Equipment Identity).
2. * # 3353 * # Reset phone.
3. * # 7337 * # Reset phone (Master reset), the SIM card had been revoked ..
4. * # 337 * # Activate / deactivate EFR.
5. * # 7693 # Activate / deactivate the Sleep Mode. Activate it to save battery consumption when the phone is not used.
6. * # 8463 * # Displays some information Sleep Mode: Wake, Sleep Req., Sleep.
7. * # 2286 * # Activate the battery data.
8. * # 7948 * # Turn off the phone.
9. * # 7728 * # Displays RSAV.
10. * # 7524 * # Displays KCGPRS.
11. * # 7562 * # Displays the SIM Phase.
12. * # 7629 * # Displays POOL MAX.
13. * # 7632 * # Displays Code bugging from sleep mode.
14. * # 7733 * # Displays the active cluster.
15. * # 7343 * # Displays Cluster code.
16. * # 7352 * # Displays the registration software.
17. * # 7763 * # Displays product information.
18. * # 7766 * # Displays the product version.
19. * # 7326 * # Displays the choice of accessories for a vibrator.
20. * # 7276 * # Activate the GPRS Attach.
21. * # 7287 * # Activate the GPRS-attached.
22. * # 7288 * # Activate the GPRS Attached Try.
23. * # 7271 * # Activate GPRS Class 1
24. * # 7274 * # Activate GPRS Class 4.
25. * # 7252 * # Activate GPRS Class B.
26. * # 7224 * # Activate GPRS Class C.
27. * # 7222 * # Activate CSD GSM Class C.
28. * # 7762 * # To SMS bearer GPRS settings.
29. * # 8377 * # Displays the software version.
30. * # 3377 * # Displays EEPROMP conditions.
31. * # 2254 # Status Register.
32. * # 2255 # Active / Deactive "Debug Call", when activated, make a call to a busy line an the phone will display some hex-codes on the display.
33. * # 2558 # The time in days, hours, and minutes you are connected to the net ..
34. * # 7489 * # or * # 1234 * # Security Code.
35. * # 7378 * # Name, Length, SIM Phase.
36. * # 3333 * # Blocking list.


Panasonic and Alcatel Secret Codes

Below are a few secret codes of Panasonic and Alcatel mobile phones. You can use these Panasonic and Alcatel secret codes on your mobile phone
Note: There is some code that can only be used on mobile phone-type specific


Please try your code.
But damages that occur as a result of the phone you use this code outside of our responsibility.

Panasonic
1. * # 06 # Displays the IMEI number (International Mobile Equipment Identity).
2. ** 7370 # Format birthday.


LG
1. * # 06 # Displays the IMEI number (International Mobile Equipment Identity).
2. # # # 847 # Reset full.
3. # # # 765 * 02 # Block incoming or outgoing calls (Add barring groups).
4. # # # 78 # 765 * Barring Disable groups.
5. # # # 765 * 05 # Disable / lock the network status.
6. # # # 765 * 07 # Enable network status.
7. 000,000 * Net Monitor.


BenQ-Siemens and LG Secret Codes

Below are a few secret codes of BenQ-Siemens and LG mobile phones. You can use these BenQ-Siemens and LG secret codes on your mobile phone
Note: There is some code that can only be used on mobile phone-type specific


Please try your code.
But damages that occur as a result of the phone you use this code outside of our responsibility.


BenQ-Siemens
1. * # 06 # Displays IMEI number (International Mobile Equipment Identity).
2. * # 0000 # Restore to the default language.
3. * # 0001 # and press the green button (Call) Change the language using a code. Figures 0001 is the code for the English language. Code: 0030 (Greece), 0031 (Netherlands), 0032 (France), 0034 (Spain), 0039 (Italy), 0049 (Germany), 0090 (Turkey)
4. * # 9999 # reset to the initial settings (the manufacturer).
5. * # 300 # to check the software.
6. * # 301 # to check the hardware.

LG
1. * # 06 # Displays IMEI number (International Mobile Equipment Identity).
2. * # 07 # IMEI number Menampikan and software version (LG 510).
3. 8375 * # Displays the software version (LG B1200).
4. # Test PWR668 manufacturer (LG B1200).
5. 1945 # 5101 # Simlock menu (LG B1200).
6. 2945 # * 5101 # Simlock menu (LG 510W, 5200)
7. 2945 # * 70001 # Simlock menu (LG 7020.7010)

Siemens secret codes

Below are a few secret codes of Siemens mobile phones. You can use these Siemens secret codes on your mobile phone
Note: There is some code that can only be used on mobile phone-type specific


Please try your code.
But damages that occur as a result of the phone you use this code outside of our responsibility.

Siemens secret codes


1. * # 06 # Displays IMEI number (International Mobile Equipment Identity).
2. * # 0000 # Restore to the default language.
3. ** 05 * PUK * newPIN * newPIN # Deblock using PIN PUK.
4. PUK2 ** 052 * * newPIN2 * newPIN2 # Deblock PIN2 using PUK2.
5. Old_PIN ** 04 * * * new_PIN # new_PIN Change PIN.
6. Old_PIN2 ** 042 * * * new_PIN2 # new_PIN2 Change PIN2.
7. * 31 # Hide the name / phone number on the mobile phone of the recipient (CLIR).
8. # 31 # Disable CLIR.
9. * # 31 # to check the status of CLIR.
10. * 30 # Displays the name / phone number on the mobile phone of the recipient (Clip).
11. 30 # # Turn off the clip.
12. * # 30 # to check the status of clip.
13. * 43 # Activate Call Waiting / Call Hold.
14. # 43 # # Turn off Call Waiting.
15. * # 43 # to check the status of Call Wating.
16. * # 0001 # and press the green button (Call) Change the language using a code. Figures 0001 is the code for the English language. Code: 0030 (Greece), 0031 (Netherlands), 0032 (France), 0034 (Spain), 0039 (Italy), 0049 (Germany), 0090 (Turkey).
17. * # 0606 # Shows if the phone is locked to any network (Use without SIM card).


Motorola Secret codes

Below are a few secret codes of Motorola mobile phones. You can use these Motorola secret codes on your mobile phone
Note: There is some code that can only be used on mobile phone-type specific

Motorola


1. * # 06 # Displays IMEI number (International Mobile Equipment Identity).
2. * # 303 # OK Change to the English language.
3. * # 300 # OK Displays the software version (SW and HW Version).
4. * # 301 # OK Test keypad.
5. 1234 OK Code default ponsel.
6. * # 311 # OK Changing default phone code.
7. *** 113 * 1 * OK Net Monitor ON.
8. ** 113 * 1 * OK Net Monitor OFF.
9. * # 304 # OK Set Off mode engineering.
10. * # 1998072 * 304 # OK Set On engineering mode.
11. * 307 * # OK Engineering test mode.
12. * # 400 # OK ADC val call.
13. 19980722 OK Master unlock code for phone and sim lock.
14. * # 0000 # OK Setting and restore.
15. * # 402 # OK Contrast
16. * # 305 # OK Location 1


Please try this code.
But damages that occur as a result of the phone you use this code outside of our responsibility.


Sony Ericsson Secret Codes

Below are a few secret codes of samsung mobile phones. You can use these Sony Ericsson secret codes on your mobile phone
Note: There is some code that can only be used on mobile phone-type specific


Sony Ericsson
1 .* # 06 # Displays IMEI number (International Mobile Equipment Identity).
2. * # 0000 or # 0000, their return to the English language.
3. >*<<*<* The service menu and the software version. Press Yes button repeatedly to see all the data software and press> to view all the text that are on the phone.


Please try this code.
But damages that occur as a result of the phone you use this code outside of our responsibility


Samsung Secret codes

Samsung secret codes
Below are a few secret codes of samsung mobile phones. You can use these samsung secret codes on your mobile phone
Note: There is some code that can only be used on mobile phone-type specific


1. * # 06 # Displays IMEI number (International Mobile Equipment Identity).
2. * # 9999 # or * # 9998 * 9999 # Show software version.
3. * # 9999 # or * # 9998 * 8888 # Displays the hardware version.
4. * 9998 * # 76 # Displays the number of production.
5. * # 9998 * 288 # or * # 0288 # to check the battery status.
6. * # 0246 # or * # 0377 # Displays the capacity of storage space / memory.
7. * # 9998 * 782 # or * # 0782 # Displays the date and time of alarm.
8. * # 8999 * 638 # Show network information.
9. * # 9998 * 523 # or * # 0523 # Set the screen contrast.
10. * # 8999 * 5646 # Change operator logo.
11. * # 0289 # test ringtone.
12. * # 9998 * 842 # or * # 0842 # Test vibrate.
13. * # 9998 * 289 # or * # 0289 # Change the alarm sound.
14. * # 9998 * 746 # or * # 0746 # SIM card View information
15. * 2767 * 2878 # Lock the phone.
16. * 2767 * 3855 # reset the memory, do not forget to pull out the SIM card.
17. * # 0324 # Net Monitor
18. * # 0001 # Display RS232 serial communication parameter setup.
19. * 9266 # Display received channel number and received intensity.
20. * # 9998 * 377 # or * # 0377 # Software error LOG (wrong display of EEPROM).
21. * # 9998 * 778 # or * # 0778 # SIM Service Table.
22. * # 0837 # Software Instruction.
23. * # 0001 # Show Serial Parameters.
24. * # 9998 * 968 # View Melody Alarm.
25. * # 9998 * 585 # Non volatile Memory.
26. * # 3243948 # Digital Audio Interference off.
27. * # 32436837 # Digital Audio Interference.
28. * # 9998 * 4357 # Help Menu.
29. * # 9998 * 5282 # Java menu.
30. * 2767 * 5282 # Java Reset.
31. * 2767 * 927 # WAP Reset.
32. * 2767 * 63342 # Reset Media.
33. * # 9999 # 0 # Monitor Mode.

Please try your code.
But damages that occur as a result of the phone you use this code outside of our responsibility.

Cara bisnis online gratis di internet menggunakan blog blogspot untuk pemula

Seperti judul postingan ini yang membahas tentang bisnis online gratis di internet menggunakan blog blogspot untuk pemula, maka di bawah ini saya mencoba membuat beberapa jawaban sesuai dengan pengalaman saya membuat blog dan mencoba me-monetize (menghasilkan uang) blog, khususnya untuk teman yang menggunakan blog gratisan. Agar lebih mudah dipahami buat teman-teman yang masih pemula , postingan ini bukanlah panduan secara detail tetapi mungkin semacam sekilas tinjauan tentang cara cari uang di internet dengan modal blog gratisan blogspot, maka saya buat menjadi semacam postingan tanya jawab (sumber pertanyaan dari email teman-teman yang pernah menanyakan tentang bisnis online ke email saya), seperti di bawah ini:

1. Apakah blog dengan sub domain blogspot (blogger) bisa ikutan bisnis online.
jawaban:
Bisa.
Jika anda membuat blog di blogspot maka anda akan mendapatkan sebuah blog sub domain blogspot yang bisa anda kelola, contoh blog saya: http://artikelkomputerku.blogspot.com, anda bisa menggunakan blog tersebut untuk mengikuti bisnis online tanpa khawatir di banned oleh blogger (google)


2. Bisnis online apa saja yang bisa diikuti:
Jawaban:
berikut ini adalah program bisnis online di internet yang gratis biaya pendaftaran yang saya rekomendasikan:
a.bisnis online PPC (Pay per click) Lokal
b.bisnis online Google adsense (Pay per click mancanegara)
c.bisnis online text link ads (jualan link)
d.bisnis online affiliasi amazon

3. Bagaimana cara kerja pcc dan apa saja ppc lokal yang terpercaya (realible)
Jawaban:
PPC Lokal (pay per click), adalah sebuah program periklanan yang mempertemukan antara advertiser (pengiklan) dan publisher (blogger) dimana anda akan dibayar setiap ada pengunjung yang klik iklan ppc yang ada di blog anda.ada juga ppc yang memberikan bayaran tertentu setiap iklan dibuka /tampil per 1000 kali.
Untuk mengikuti program ppc ini, anda harus mendaftar ke situs penyedia ppc, kemudian copy script ppc yang ada di member area, selanjutnya masukan script ppc ke blog anda, maka saat blog anda dibuka akan muncul iklan ppc-nya
saat ini ada beberapa ppc yang bisa anda ikuti:
kumpulblogger, kliksaya, adsensecamp, ppc indo, biindit, dll
Besarnya komisi bervariasi dari Rp.150 hingga Rp.350/klik untuk iklan reguler. Biaya pendaftaran gratis.

4. Apakah blog gratisan bisa ikutan Google adsense dan bagaimana cara kerja google adsense
Jawab:
Blog gratisan blogspot (blogger) bisa ikut google adsense.
Google adsense merupakan sebuah program periklanan berbasis ppc (milik google) yang bisa anda ikuti untuk menghasilkan uang dari blog anda, ada beberapa fitur /jenis program periklanan yang ditawarkan oleh google adsense:

Untuk account berbahasa indonesia (saat mendaftar anda menggunakan blog berbahasa Indonesia, dan memilih languange "Indonesia") hanya tersedia google adsense for search, google adsense for feed, google adsense for domain. Jika saat mendaftar google adsense anda menggunakan blog berbahasa Inggris dan memilih language "English", akan ada tambahan adsense text ads.

a. Google adsense for search , adalah sebuah fasilitas pencarian web yang di lengkapi dengan iklan dari google, penghasilan diperoleh dari pengunjung yang klik iklan, biasanya di bagian atas halaman pencarian akan muncul iklan di tandai dengan kotak Ads by Google(iklan tidak selamanya muncul, tergantung keyword yang diketik di kotak pencarian).

Contoh google adsense for search bisa dilihat disini google adsense

b. Google adsense for feed
Google adsense for feed adalah program adsense google yang bisa anda gunakan untuk memasukkan iklam google ke dalam feed blog anda.
Contoh adsense for feed bisa dilihat disini:
Adsense feed indonesia
Adsense feed englih

c. Google adsense ads (text ads + image ads +video ads)

Iklan ini hanya ada jika account blog anda berbahasa inggris, bisa berjalan dengan baik di blog yang konten (isi postingannya) berbahasa Inggris, namun terkadang ada beberapa blogger yang memasang di blog berbahasa Indonesia. iklan text ads terkadang muncul terkadang hanya public ads (tergantung keyword).
penghasilan blog anda bersumber dari pengunjung yang kilk iklan google yang terpasang di blog anda. di bagian header ada iklan dari google.
Contoh blog saya yang terpasang iklan text ads google adsense bisa dilihat disini: google adsense ads

d. Google adsense for domain

Biasanya jika blogger punya domain ( membeli/menyewa domain berbayar), jika menyewa beberapa domain dan belum sempat mengupdate /mengisi domain tersebut, maka terkadang menggunakan domain tersebut di parkir di situs yang menyediakan layanan domain parking. Biasanya domain yang mengikuti program periklanan domain parking, di situsnya hanya berisi link-link sponsor (iklan), jika ada pengunjung yang masuk ke situs tersebut maka bingung untuk keluar karean ayang ada hanya link iklan saja, bolak balik klik sana klik sini akan membuak situs iklan, penghasilan pemilik domain tersebut kana mendapatkan hasil dari klik pengunjung terhadap link sponsor.


5. Apakah blog berbahasa Indonesia bisa ikut google adsense
Jawab:
Blog berbahasa Indonesia (berbayar/gratisan (blogspot)) bisa ikut program google adsense.

6. Bagaimana cara ikut google adsense bagaimana tips untuk cepat di approve google adsense
Jawaban:
Untuk mempercepat blog diterima google adsense:
1. Anda harus punya blog (bisa menggunakan blogspot, blog berbayar biasanya lebih diprioritaskan),saya dulu mendaftar google adsense pakai blogspot dengan blog artikel komputer bulan desember 2008 (disetujui februari 2009) , selanjutnya mencoba peruntungan dengan membuat blog berbahasa Inggris (hasil dari terjemahan google translate) proposal dimasukkan bulan april 2009, alhamdulillah ternyata diterima bulan juni 2009, jadi sekarang semua blog pakai iklan dari akun dari google adsense english. Sampai saat ini belum punya blog domain berbayar,masih setia dengan blogspot.
2. buat postingan minimal 10 , gunakan konten (isi postingan yang original), umur blog minimal 6 bulan (dulu umur blog saya masih 2 bulan langsung daftar karena modal coba-coba dan belum ada aturan umur blog 6 bulan), sebaiknya selama mengajukan permohonan google adsense anda terus update blog anda, kurangi isi blog yang berisi link affiliasi atau link referal
3. Saat mendaftar google adsense, hindari mengikuti program ppc sejenis seperti adbrite,bidvistizer, dll
4. Gunakan template yang sedikit dimodifikasi, agar google mengira anda akan bakal serius ngeblog)
5. Daftarkan blog anda ke google webmaster tools, dan lakukan verify blog anda agar google mengira anda bakal menerapakan teknik seo dalam mengembangkan blog
6. Usahakan Page rank naik saat menunggu proses approve google adsense
7. Usahakan jumlah trafik (pengunjung) bertambah saat menunggu proses approve google adsense
8. Berdoa ...dan berdoa...kepada Allah SWT,mudah-mudahan menggerakkan hati tim google untuk menyetujui blog anda, karena yang menilai blog anda disetujui atau tidak adalah staf marketing google adsense.

7. Bisakah blog dengan domain blogspot ikut bisnis online text link ads (jualan link)
Jawaban:
Untuk teman pengguna blogspot, tidak perlu berkecil hati saat ini ada blog dengan domain blogspot sudah diperhitungkan oleh situs penyedia layanan text link ads.
Beberapa contoh situs penyedia layanan teks link ads yang menyedia publisher dari blog domain blogspot adalah : ask2link, textlinkads, blogrollplease, dll
Agar dapat mengikuti text link ads anda harus meningkatkan pagerank dan trafik blog anda.

8. Bisakah blog blog dengan domain blogspot ikut bisnis online Affiliasi Amazon
jawaban:
Bisa. Anda cukup mendaftarkan blog anda ke situs amazon, kemudian mengambil scipt link produk, widget, toko online amazon (online shop amazon) dan saat ini di blogger (akun bahasa inggris) sudah ada fasilitas untuk mengintegrasikan link amzon dan tek editor blogspot, jadi saat anda membuat postingan anda bisa menambahkan link produk amazon yang berhubungan dengan tema postingan.

Sebenarnya masih banyak bisnis online yang bisa diikuti dengan hanya bermodalkan blog blogspot. Postingan di atas saya buat karena sudah mulai menghasilkan uang dollar walaupun masih sedikit).Untuk sementara sampai disini dulu postingan saya, lain kali di sambung dengan rincian yang lebih detail.
Keberhasilan bisnis online bergantung pada kesungguhan anda dalam berbisnis di internet, jangan mudah terpanting dengan postingan mendapatkan jutaan hingga miliaran dalam sebulan. Mulailah bisnis online dari yang kecil-kecil dulu mungkin buat pemula bisa menghasilkan uang ratusan ribu perbulan jika semakin berkembang bisa dapat jutaan perbulan.
Namun semuanya tergantung pada kesungguhan membuat blog,kontent berisi keyword yang high price keyword, dan dioptimasi dengan teknik SEO agar ada pengunjung blog anda.

Referensi:
Bisnis Online

Sunday, 13 December 2009

Memasang widget google translator ke blog (translator gambar bendera)

Selain google translator standar, anda juga bisa memasang widget google traslator dengan icon bendera. Jika anda mengklik ikon bendera, maka secara otomatis akan terbuka sebuah halaman hasil terjemahan dari halaman aslinya.

Widget ini hanya berfungsi jika halaman web anda berbahasa Indonesia, dalam widget ini anda bisa mengubah atau menerjemahkan isi web anda ke 16 negara (bahasa) lain. Widget ini hanyalah hasil kustomise dari google translate standar. Contohnya bisa dilihat di bawah ini:


Untuk membuat (gadget) widget google translator ke blog anda silahkan ikuti prosedur berikut:


1. Login ke Dashboard, pilih Tata Letak => Elemen Halaman
Pilih Tambah Gadget


2. pada halaman List gadget, pilih Html/Javascript


3. Pada kotak dialog berikut, merupakan tempat memasukkan kode (script) html/javascript


berikut ini adalah script untuk 8 bendera per baris.

Catatan:
Sebaiknya script di bawah ini anda copy ke notepad/wordpad, kemudian scrip dari wordpad tersebut dicopy ke gadget html blog anda, karena jika dicopy langsung dari halaman ini ke gadget html anda, biasanya ada script dari adsense infolinks yang ikut, bisa menyebabkan script tidak berfungsi dengan sempurna.


<div style="border: 1px solid rgb(204, 204, 204); margin: 5px 0pt; padding: 10px 0px 3px; text-align: center; background-color: rgb(255, 255, 255); min-width: 235px;">

<!--GOOGLE TRANSLATE WITH FLAG ICON-->
<div style="width: auto;" align="center">

<!-- Add Indonesian to English-->

<a target="_blank" rel="nofollow" onclick="window.open('http://www.google.com/translate?u='+encodeURIComponent(location.href)+'&langpair=id%7Cen&hl=id&ie=UTF8'); return false;" title="Google-Translate"><img border="0" style="cursor: pointer;" alt="English" width="24" src="http://i46.tinypic.com/k3wthh.jpg" height="24" title="Google-Translate-Indonesian-to-English"/></a>

<!-- Add Indonesian to French -->

<a target="_blank" rel="nofollow" onclick="window.open('http://www.google.com/translate?u='+encodeURIComponent(location.href)+'&langpair=id%7Cfr&hl=ied&ie=UTF8'); return false;" title="Google-Translate"><img border="0" style="cursor: pointer;" alt="French " width="24" src="http://i50.tinypic.com/2ic7cxh.jpg" height="24" title="Google-Translate-Indonesian-to-French "/></a>

<!-- Add Indonesian to German -->

<a target="_blank" rel="nofollow" onclick="window.open('http://www.google.com/translate?u='+encodeURIComponent(location.href)+'&langpair=id%7Cde&hl=id&ie=UTF8'); return false;" title="Google-Translate"><img border="0" style="cursor: pointer;" alt="German" width="24" src="http://i49.tinypic.com/2uh8xhi.jpg" height="24" title="Google-Translate-Indonesian-to-German"/></a>

<!-- Add Indonesian to Japanese -->

<a target="_blank" rel="nofollow" onclick="window.open('http://www.google.com/translate?u='+encodeURIComponent(location.href)+'&langpair=id%7Cja&hl=en&ie=UTF8'); return false;" title="Google-Translate"><img border="0" style="cursor: pointer;" alt="Japanese" width="24" src="http://i48.tinypic.com/25klr8n.jpg" height="24" title="Google-Translate-Indonesian-to-Japanese "/></a>

<!-- Add Indonesian to Korean -->

<a target="_blank" rel="nofollow" onclick="window.open('http://www.google.com/translate?u='+encodeURIComponent(location.href)+'&langpair=id%7Cko&hl=en&ie=UTF8'); return false;" title="Google-Translate"><img border="0" style="cursor: pointer;" alt="Korean " width="24" src="http://i47.tinypic.com/2ivk5ud.jpg" height="24" title="Google-Translate-Indonesian-to-Korean"/></a>

<!-- Add Indonesian to Chinese -->

<a target="_blank" rel="nofollow" onclick="window.open('http://www.google.com/translate?u='+encodeURIComponent(location.href)+'&langpair=id%7Czh-CN&hl=id&ie=UTF8'); return false;" title="Google-Translate"><img border="0" style="cursor: pointer;" alt="Chinese" width="24" src="http://i46.tinypic.com/2hyfj3p.jpg" height="24" title="Google-Translate-Indonesian-to-Chinese"/></a>

<!-- Add Indonesian to Russian -->

<a target="_blank" rel="nofollow" onclick="window.open('http://www.google.com/translate?u='+encodeURIComponent(location.href)+'&langpair=id%7Cru&hl=en&ie=UTF8'); return false;" title="Google-Translate"><img border="0" style="cursor: pointer;" alt="Russian" width="24" src="http://i48.tinypic.com/9r4u11.jpg" height="24" title="Google-Translate-Indonesian-to-Russian "/></a>

<!-- Add Indonesian to Spanish -->

<a target="_blank" rel="nofollow" onclick="window.open('http://www.google.com/translate?u='+encodeURIComponent(location.href)+'&langpair=id%7Ces&hl=en&ie=UTF8'); return false;" title="Google-Translate"><img border="0" style="cursor: pointer;" alt="Spanish" width="24" src="http://i45.tinypic.com/2l8i49c.jpg" height="24" title="Google-Translate-Indonesian-to-Spanish "/></a>

<br/>
<!-- Add Indonesian to India -->

<a target="_blank" rel="nofollow" onclick="window.open('http://www.google.com/translate?u='+encodeURIComponent(location.href)+'&langpair=id%7Ciw&hl=en&ie=UTF8'); return false;" title="Google-Translate"><img border="0" style="cursor: pointer;" alt="India " width="24" src="http://i47.tinypic.com/2h35rfd.jpg" height="24" title="Google-Translate-Indonesian-to-India "/></a>

<!-- Add Indonesian to Saudi Arabia -->

<a target="_blank" rel="nofollow" onclick="window.open('http://www.google.com/translate?u='+encodeURIComponent(location.href)+'&langpair=id%7Car&hl=en&ar=UTF8'); return false;" title="Google-Translate"><img border="0" style="cursor: pointer;" alt="Saudi Arabia" width="24" src="http://i45.tinypic.com/24nqufd.jpg" height="24" title="Google-Translate-Indonesian-to-Saudi Arabia"/></a>

<!-- Add Indonesian to Netherland-->

<a target="_blank" rel="nofollow" onclick="window.open('http://www.google.com/translate?u='+encodeURIComponent(location.href)+'&langpair=id%7Cnl&hl=en&ar=UTF8'); return false;" title="Google-Translate"><img border="0" style="cursor: pointer;" alt="Netherland" width="24" src="http://i45.tinypic.com/2a7ik5t.jpg" height="24" title="Google-Translate-Indonesian-to-Netherland"/></a>

<!-- Add Indonesian to Portugal -->

<a target="_blank" rel="nofollow" onclick="window.open('http://www.google.com/translate?u='+encodeURIComponent(location.href)+'&langpair=id%7Cpt&hl=en&ar=UTF8'); return false;" title="Google-Translate"><img border="0" style="cursor: pointer;" alt="Portugal" width="24" src="http://i47.tinypic.com/2vlv60m.jpg" height="24" title="Google-Translate-Indonesian-to-Portugal"/></a>

<!-- Add Indonesian to Italian-->

<a target="_blank" rel="nofollow" onclick="window.open('http://www.google.com/translate?u='+encodeURIComponent(location.href)+'&langpair=id%7Cit&hl=en&ar=UTF8'); return false;" title="Google-Translate"><img border="0" style="cursor: pointer;" alt="Italian" width="24" src="http://i45.tinypic.com/8ygifd.jpg" height="24" title="Google-Translate-Indonesian-to-Italian"/></a>

<!-- Add Indonesian to Philippines-->

<a target="_blank" rel="nofollow" onclick="window.open('http://www.google.com/translate?u='+encodeURIComponent(location.href)+'&langpair=id%7Ctl&hl=en&ar=UTF8'); return false;" title="Google-Translate"><img border="0" style="cursor: pointer;" alt="Philippines" width="24" src="http://i47.tinypic.com/2r7pkdu.jpg" height="24" title="Google-Translate-Indonesian-to-Philippines"/></a>

<!-- Add Indonesian to Ukraina-->

<a target="_blank" rel="nofollow" onclick="window.open('http://www.google.com/translate?u='+encodeURIComponent(location.href)+'&langpair=id%7Cuk&hl=en&ar=UTF8'); return false;" title="Google-Translate"><img border="0" style="cursor: pointer;" alt="Ukraina" width="24" src="http://i50.tinypic.com/bij5s4.jpg" height="24" title="Google-Translate-Indonesian-to-Ukraina"/></a>

<!-- Add Indonesian to Norwegia-->

<a target="_blank" rel="nofollow" onclick="window.open('http://www.google.com/translate?u='+encodeURIComponent(location.href)+'&langpair=id%7Cno&hl=en&ar=UTF8'); return false;" title="Google-Translate"><img border="0" style="cursor: pointer;" alt="Norwegia" width="24" src="http://i45.tinypic.com/2u61agg.jpg" height="24" title="Google-Translate-Indonesian-to-Norwegia"/></a>

</div>

<small>Powered by</small> <img src="http://www.google.com/ig/modules/translatemypage_content/logo.gif" align="absbottom"/><br/>
<small><a href="http://mycomputerdummies.blogspot.com/" target="_blank">Widget translator</a></small><br/>

</div>


Contoh blog yang telah menggunakan widget google translate dengan ikon bendera bisa dilihat disini Kalong
Secara probadi saya lebih suka memakai google translate standar (tanpa bendera), karena kelihatan lebih sederhana.

Tuesday, 8 December 2009

Defrag file using Defraggler (freeware)

Defraggler is a software to defrag your entire hard drive, or individual files - unique in the industry. This compact and portable Windows application supports NTFS and FAT32 file systems.

You can download Defraggler here: freeware file defragmenter


Friday, 4 December 2009

Windows PE Live CD

Microsoft Windows Pre-installation Environment (Windows PE) is a powerful replacement for the Microsoft MS-DOS operating system in your deployment processes, test and diagnostic tool development, and system recovery processes. Windows PE is a minimal Windows system that provides limited services based on the Windows XP Professional and the Windows Server 2003 kernels. It also provides the minimal set of features required to run Windows Setup, access and install operating systems from the network, script basic repetitive tasks, and validate hardware.


The WinPE does not require a hard drive to boot; it can run solely from a CD drive using the memory for dynamic data. This feature makes the WinPE appealing for data recovery and system maintenance purposes.

However, in the market, there isn't the Windows Pre-installation Environment for sale. You can use software named BartPE to produce the WinPE.


Download Windows PE


EASEUS Deleted File Recovery (free data recovery software)

EASEUS Deleted File Recovery is a fully functional freeware designed to recover deleted files from all types of media such as Hard Disk Drives, Floppy Drives, Smart Media, Compact Flash, Memory Sticks, and other types of removable media.

Features


* Restores files after mistakenly-deletion.
* Retrieves almost all types of files.
* Recovers from local PC and various portable devices.
* Supports FAT 12, FAT 16, FAT 32 and NTFS file system.
* Supports Windows 2000/2003/XP/VISTA.
* Previews recoverable files.
* Fast and easy-to-use with a Graphical User Interface.
* Safest read only software

Download now : data recovery

Wednesday, 2 December 2009

Free download ECW-Plug in for ArcGIS and AutoCAD

ECW Plug-in functions to read the ER Mapper Compression file format in Arc GIS or AutoCAD

You can download ECW Plug-in or ECW extension here : ECW


Free ArcGIS Tutorial

ArcGIS is a suite consisting of a group of geographic information system (GIS) software products produced by ESRI. At the desktop GIS level, ArcGIS can include: ArcReader, which allows one to view and query maps created with the other Arc products; ArcView, which allows one to view spatial data, create layered maps, and perform basic spatial analysis; ArcEditor which, in addition to the functionality of ArcView, includes more advanced tools for manipulation of shapefiles and geodatabases; or ArcInfo which includes capabilities for data manipulation, editing, and analysis. There are also server-based ArcGIS products, as well as ArcGIS products for PDAs. Extensions can be purchased separately to increase the functionality of ArcGIS.


The following are some tips , tricks and tutorials about ArcGIS applications


Tuesday, 1 December 2009

Learn Indonesia languange (free online)

Below site to learn some exam Indonesian languange:

http://www.sekolahkami.com/banksoal/sma12indlat003.html
http://www.e-dukasi.net/index.php
http://www.sekolahkami.com/banksoal/index.html
http://www.klikbahasa.com/
http://www.rumahbahasa-online.com/


Saturday, 28 November 2009

Download Free video screen capture software supporting audio recording

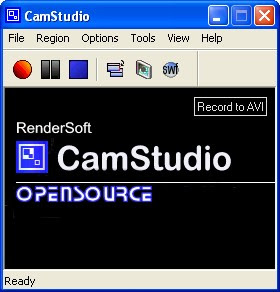
CamStudio (Freeware/Windows) is able to record all screen and audio activity on your computer and create industry-standard AVI video files and using its built-in SWF Producer can turn those AVIs into lean, mean, bandwidth-friendly Streaming Flash videos (SWFs).

Here are just a few ways you can use this software:


* You can use it to create demonstration videos for any software program
* Or how about creating a set of videos answering your most frequently asked questions?
* You can create video tutorials for school or college class
* You can use it to record a recurring problem with your computer so you can show technical support people
* You can even use it to record new tricks and techniques you discover on your favourite software program, before you forget them


CamStudio can also add high-quality, anti-aliased (no jagged edges) screen captions to your recordings in seconds and with the unique Video Annotation feature you can even personalise your videos by including a webcam movie of yourself "picture-in-picture" over your desktop.
Lossless video codec

And if all that wasn't enough, CamStudio also comes with its own Lossless Codec that produces crystal clear results with a much smaller filesize compared with other more popular codecs, like Microsoft Video 1.
Total control over the output of your video

You can choose to use custom cursors, to record the whole screen or just a section of it and can reduce or increase the quality of the recording depending on if you want smaller videos (for emailing to people, for instance) or you can have "best quality" ones for burning onto CD/DVD.
Easy to use screen capture software

All of these features would be worthless if CamStudio wasn't easy to use ... fortunately that's not the case. CamStudio can be learned in a matter of minutes and comes with a comprehensive built-in helpfile, so if you do manage to get stuck, you can simply hit "Help" and get the answers you need.
Absolutely free software

You can download and use it completely free - yep - completely 100% free for your personal and commercial projects as CamStudio and the Codec are released under the GPL. There are no royalties or any monies to pay - although if you do use it for a commercial product, I wouldn't say no to a copy of whatever you produce.

Main features:

* 100% FREE software.
* High quality but small output file.
* Supports recording whole screen, specified area of screen, specified window.
* Supports sound recording.
* Supports recording mouse movements.
* Supports outputting to AVI and SWF
* Supports screen captions

System Requirements:

* 32-bit MS Windows (NT/2000/XP)

screen recorder

Please download here ...Screen recorder


Wednesday, 18 November 2009

Various boot disk (freeware)

Various boot disk you can use to repair your windows if at any time through error

1. Bootable disk from windows
2. Free boot disk from bootdisk.com
3. Free boot disk from freepctech.com
4. Free boot disk from answersthatwork.com

5. Bootable CD Windows XP From Microsoft (size 4.4 MB)
Windows XP Home Edition
Windows XP Home Edition SP1
Windows XP Professional SP1
Windows XP Home Edition SP2
Windows XP Professional SP2
Download here Bootable CD Windows XP


MS-DOS 6.2 Step-up Files (size 2.5 MB)
http://www.microsoft.com/downloads/details.aspx?FamilyID=96CC3197-B7E5-4B31-BADB-DDAAC771295F&displayLang=en


Monday, 16 November 2009

How to verify the blog (website) to google sitemap

Some facilities Google Webmaster tools you can use for free is Google Analityc and Google Sitemaps. Google Sitemaps will be useful to assist Googlebot in knowing (browse) all the pages on your site, making it easier for Google to index all the pages on your site.

To register a blog to google sitemap click here google webmaster tools
(note: you can blog on the list after you lists googlesitemap blog on google and indexed by google)
1. enter your password and user name google account (similar to google your blog account)
2. Once successfully logged in, your dashboard will display a Google sitemap page


sitemap
3. Enter your blog url: http://nameyourblog.com
for example: http://mycomputerdummies.blogspot.com/
Click the Add Site


4. Click Verify your site

google sitemap
5. The following page will appear
In the "choose verification method" select "Add a meta tag"


6. Will appear script meta tag (see red arrow)
You copy the script into your blog template

verify sitemap
7. Log in to your blog account
Select the Dashboard -> layout -> Edit html
Check Expand widget templates
Enter the google sitemap script after head and before the tittle blog (google recommended)

<head>
install google sitemap sccript here
<title><data:blog.pageTitle/></title>

result script like below:

<head>
<meta content='RBpPtBYjErQbhxgO3N+uY4IkmSeDchwXpuk3CH+i1II=' name='verify-v1'/>
<title><data:blog.pageTitle/></title>


Click the Save Template


8. Return to page google sitemap (see step 6)
Click the Verify button
If successful it will appear the following success message.

sitemap blog