You can download ECW Plug-in or ECW extension here : ECW
Showing posts with label ArcGIS Tutorial. Show all posts
Showing posts with label ArcGIS Tutorial. Show all posts
Wednesday, 2 December 2009
Free download ECW-Plug in for ArcGIS and AutoCAD
ECW Plug-in functions to read the ER Mapper Compression file format in Arc GIS or AutoCAD
You can download ECW Plug-in or ECW extension here : ECW
You can download ECW Plug-in or ECW extension here : ECW

Free ArcGIS Tutorial
ArcGIS is a suite consisting of a group of geographic information system (GIS) software products produced by ESRI. At the desktop GIS level, ArcGIS can include: ArcReader, which allows one to view and query maps created with the other Arc products; ArcView, which allows one to view spatial data, create layered maps, and perform basic spatial analysis; ArcEditor which, in addition to the functionality of ArcView, includes more advanced tools for manipulation of shapefiles and geodatabases; or ArcInfo which includes capabilities for data manipulation, editing, and analysis. There are also server-based ArcGIS products, as well as ArcGIS products for PDAs. Extensions can be purchased separately to increase the functionality of ArcGIS.
The following are some tips , tricks and tutorials about ArcGIS applications
The following are some tips , tricks and tutorials about ArcGIS applications
Monday, 27 July 2009
GFZ Potsdam - Earthquake Bulletin
GFZ Potsdam - Earthquake Bulletin a real-time bulletin is a product of the GEOFON Extended Virtual Network (GEVN) and credit belongs to all involved institutions!
You can view information about the location of the earthquake in realtime
To view information, click on the origin time

Example:
GFZ Potsdam - Earthquake Bulletin
Region: Minahassa Peninsula, Sulawesi
Time: 2009-07-27 13:30:55.3 UTC
Magnitude: 4.5
Epicenter: 123.45°E 0.09°S
Depth: 140 km
Status: manually revised
Picture:

If you want to access the webiste GFZ, please click here
You can view information about the location of the earthquake in realtime
To view information, click on the origin time

Example:
GFZ Potsdam - Earthquake Bulletin
Region: Minahassa Peninsula, Sulawesi
Time: 2009-07-27 13:30:55.3 UTC
Magnitude: 4.5
Epicenter: 123.45°E 0.09°S
Depth: 140 km
Status: manually revised
Picture:

If you want to access the webiste GFZ, please click here
Tuesday, 14 July 2009
Remote Sensing Software
Remote Sensing data is processed and analyzed with computer software, known as a remote sensing application. A large number of commercial and open source applications exist to process remote sensing data.
The most used applications among Asian academic groups involved in remote sensing are as follows:
a. Raster based:
1. ENVI
2. ERMapper
3. ERDAS IMAGINE
4. PCI Geomatica
5. Ilwis
6. Global Mapper, etc
b. Vector based:
1. ESRI (Arc Info,Arc View & Arc GIS)
2. MapInfo
3. AutoDesk Map (AutoCAD Map)
4. Surfer, etc
src="http://pagead2.googlesyndication.com/pagead/show_ads.js" type="text/javascript">
The most used applications among Asian academic groups involved in remote sensing are as follows:
a. Raster based:
1. ENVI
2. ERMapper
3. ERDAS IMAGINE
4. PCI Geomatica
5. Ilwis
6. Global Mapper, etc
b. Vector based:
1. ESRI (Arc Info,Arc View & Arc GIS)
2. MapInfo
3. AutoDesk Map (AutoCAD Map)
4. Surfer, etc
src="http://pagead2.googlesyndication.com/pagead/show_ads.js" type="text/javascript">
Friday, 3 July 2009
Getting to Know ArcGIS Desktop: The Basics of ArcView, ArcEditor, and ArcInfo for ArcGIS 9

This book provides a tour of the ArcGIS integrated development environments for ArcMap and ArcCatalog, and it does a good job of it. It's definitely intended for absolute newcomers to ArcGIS software-- it walks you through step-by-step exercises to explore many of the software's features.
The step-by-step exercises are carefully written and extremely detailed-- almost too detailed. Each exercise gives full instructions for every step, even steps you performed in earlier exercises. I wish the book would have only given detailed instructions the first time you performed a particular task. I think this would help the reader commit the information to memory and really learn the software instead of just following the steps again in each exercise.
With revised material and new exercises based on ArcGIS version 9, this updated work acquaints geographers and GIS professionals with the principles of GIS as it teaches the mechanics of using ArcGIS software. Conceptual material is followed by scripted software exercises. Necessary GIS skills are presented in a variety of areas-map symbology, data overlay, map projection, and data conversion-as the making of maps and the analysis of geographic data is conceptualized. Spatial modeling exercises using the ModelBuilder technology of ArcGIS version 9 are also provided. Other topics covered include organizing data, planning a GIS project, creating derived data, and presenting results.
Book Preview
Saturday, 16 May 2009
Map Digitization
Map Digitization is the process of changing the map format from Raster to vector format. In the arc gis there are options in the form of data: point, polyline, polygon.
In practice this will be done to digitize the administration map
Working procedure:
1. Click on the toolbar editor Editor, click Start editing, select the layer petaadministrasi2.shp click OK. Make sure the columns in the selected target petaadministrasi2 (so the data stored in the polygon layer petaadministrasi2).
2. In the Task column select Create New Feature, click the pen button to start digitizing.

You can start by clicking the adminisrasi limit, and after double click. The result may look like the image below

3. Click the polygon boundaries are administrative
4. In the Task column select Cut Polygon Feature
5. Click on the start point A and ends at point B, (try a line so that you make are cut administrative boundary polygon)

6. If success then result may look like the image below
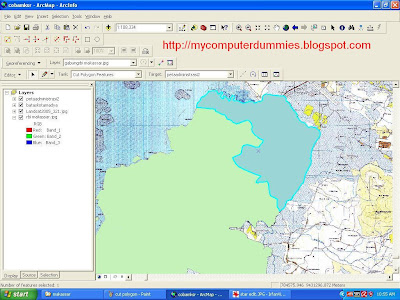
7. Do the same for the other districts.

Results digitasi akan looks as follows:
In practice this will be done to digitize the administration map
Working procedure:
1. Click on the toolbar editor Editor, click Start editing, select the layer petaadministrasi2.shp click OK. Make sure the columns in the selected target petaadministrasi2 (so the data stored in the polygon layer petaadministrasi2).
2. In the Task column select Create New Feature, click the pen button to start digitizing.

You can start by clicking the adminisrasi limit, and after double click. The result may look like the image below

3. Click the polygon boundaries are administrative
4. In the Task column select Cut Polygon Feature
5. Click on the start point A and ends at point B, (try a line so that you make are cut administrative boundary polygon)

6. If success then result may look like the image below

7. Do the same for the other districts.

Results digitasi akan looks as follows:
Set the Map Units and Display Units
For ease in measuring the distance or area on the mode "data view" and set the scale on the "layout view" then the unit must be specified of "map unit" and "display unit".
Working procedure:
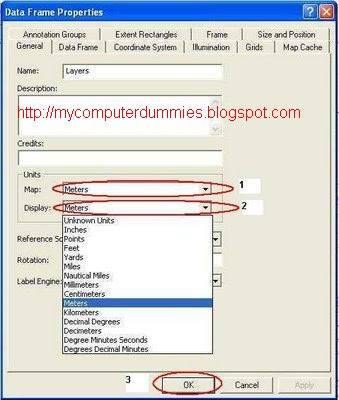
1. In the arc of the map right click on the layer, click on properties

2. In the ListBox Map (no. 1) select meter, and on Display (No.2) select meter, click OK. View of the coordinates is changed so meters. (In the ArcGIS 9.2 is usually located on the lower right corner)
Working procedure:
1. In the arc of the map right click on the layer, click on properties

2. In the ListBox Map (no. 1) select meter, and on Display (No.2) select meter, click OK. View of the coordinates is changed so meters. (In the ArcGIS 9.2 is usually located on the lower right corner)

Monday, 27 April 2009
Make a shapefile using arccatalog
Making "shapefile" is done by using arccatalog. Shp file can be edited to show at the arcmap. The procedures performed are:
1. Activate the arccatalog from the start menu: start -> programs -> arcgis -> arccatalog (or arc using the toolbar on the catalog sheets of arc map)
2. After the active arc catalog, go to working directory (D: \ makassar)
3. Right-click on the directory , select new, click shapefile ....

4. After dialog box appears ,
in the name box type "kecamatan", and in feature type select "polygon"
Click Edit button to determine the spatial reference
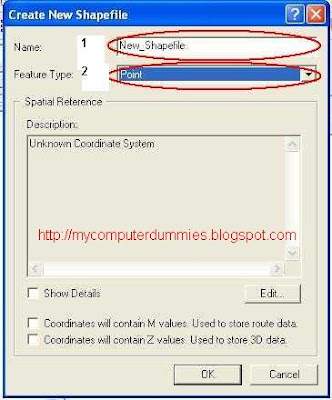

5. In the dialog box select the spatial reference properties select the button, the browse dialog box for select Coordinate system wgs 1984 Coordinate UTM zone 50S.prj, then kilk Add, click OK

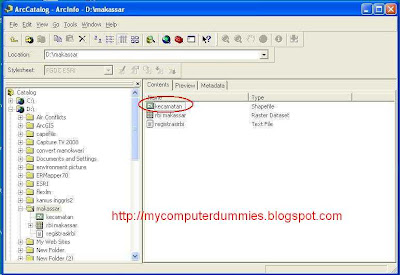
6.If you have to do the above, then the spreadsheet will appear arc catalog file: kecamatan.shp

7. You can create other shape files by using step 3 to 7
1. Activate the arccatalog from the start menu: start -> programs -> arcgis -> arccatalog (or arc using the toolbar on the catalog sheets of arc map)
2. After the active arc catalog, go to working directory (D: \ makassar)
3. Right-click on the directory , select new, click shapefile ....

4. After dialog box appears ,
in the name box type "kecamatan", and in feature type select "polygon"
Click Edit button to determine the spatial reference


5. In the dialog box select the spatial reference properties select the button, the browse dialog box for select Coordinate system wgs 1984 Coordinate UTM zone 50S.prj, then kilk Add, click OK

6.If you have to do the above, then the spreadsheet will appear arc catalog file: kecamatan.shp

7. You can create other shape files by using step 3 to 7

Registration Raster format jpeg, bmp, tiff with georeferencing method
Raster data sometimes do not have the geographic coordinates / UTM. to facilitate the processing of data in the registration must be done against the raster. Raster data is already register will have the actual coordinates. So that it can be processed further.
In this tutorial I use the software ArcGIS version 9.2
Raster registration procedures are: (in this exercise is a Raster data map in the data format is jpg)
1. Open the Arc GIS program from start menu -> Programs -> Arc GIS -> Arc Map

2. After the arc of the map opens, click the toolbar "+ sign" (to add a theme or Raster). After you click the toolbar "+", then a dialog box will appear and select the file you want register (in this example is used rbi_makassar.jpg). After Raster rbi_makassar appear, make sure the layer selected in the box "rbi_makassar.jpg"
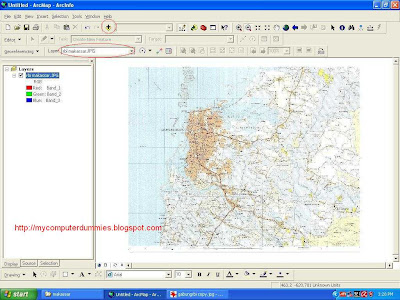
3. Activate dialog box georeferencing
 Click a button A to determine the location of the point coordinates, and click the button B to see the value and enter the coordinates (Make registration coordinates are at least 4 point, in the corner picture). Input XMap and YMap Coordinates. After registration finish, you can save the coordinate results into a file txt format with click save button.

4. Registration results will be seen as following
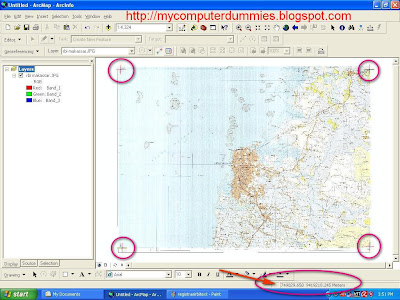
In this tutorial I use the software ArcGIS version 9.2
Raster registration procedures are: (in this exercise is a Raster data map in the data format is jpg)
1. Open the Arc GIS program from start menu -> Programs -> Arc GIS -> Arc Map

2. After the arc of the map opens, click the toolbar "+ sign" (to add a theme or Raster). After you click the toolbar "+", then a dialog box will appear and select the file you want register (in this example is used rbi_makassar.jpg). After Raster rbi_makassar appear, make sure the layer selected in the box "rbi_makassar.jpg"

3. Activate dialog box georeferencing
 Click a button A to determine the location of the point coordinates, and click the button B to see the value and enter the coordinates (Make registration coordinates are at least 4 point, in the corner picture). Input XMap and YMap Coordinates. After registration finish, you can save the coordinate results into a file txt format with click save button.

4. Registration results will be seen as following

Subscribe to:
Posts (Atom)